FusionDock Pro 1 / 1+ Troubleshooting Guide
Navigate all issues with your FusionDock Pro 1/1+ using our comprehensive guide. Discover easy-to-follow solutions for common problems like no video output, screen flickering, and connectivity challenges, specifically tailored for Apple silicon MacBooks.
Last updated: Jan 2024
1. Video Ports Issues
1.1 No video output when using HDMI 1+HDMI 2+HDMI 3
1. Check accessories and connections
Step 1: If you are using a KVM or USB-C extension cable with the iVANKY FusionDock Pro 1, it may cause the dock signal to be lost. Please use the original USB-C cable that comes with the dock.
Step 2: Ensure that the power cable is connected to the dock. Press the dock’s power button and check if the light turns on. If it does not, please contact our after-sales team.
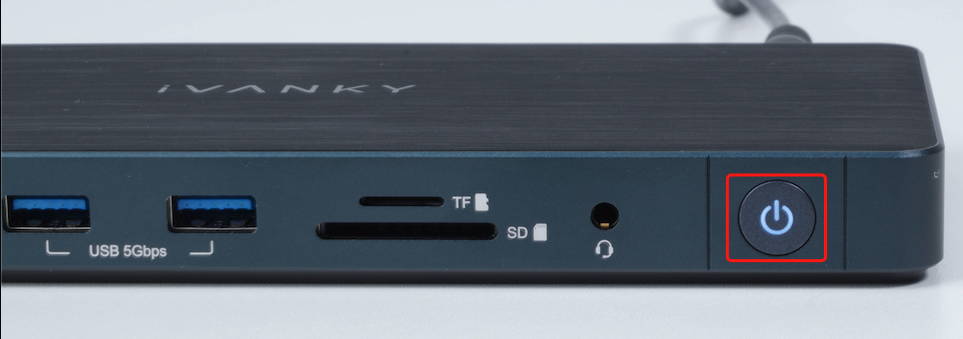
Step 3: Make sure the video cable is connected to the monitor and is secure.
Step 4: Use the provided USB-C cable to connect the dock’s USB-C port to the Mac’s USB-C port and ensure it is firmly connected.
Step 5: Flip the USB-C cable connected to the computer and re-plug it.
Step 6: Try connecting to another Thunderbolt port on the Mac.
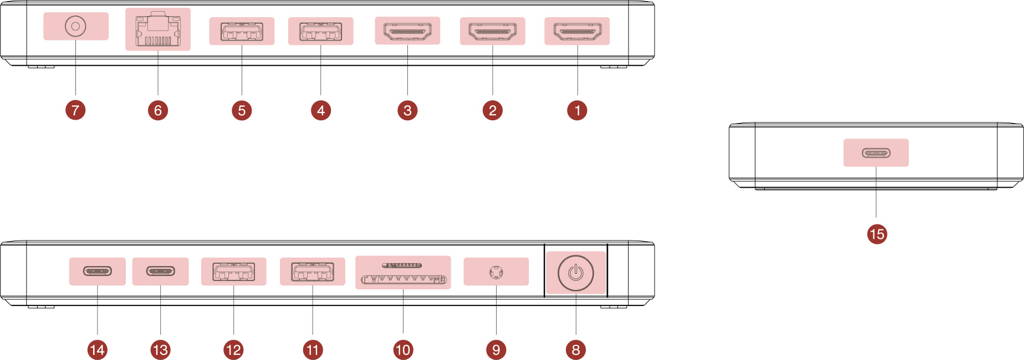
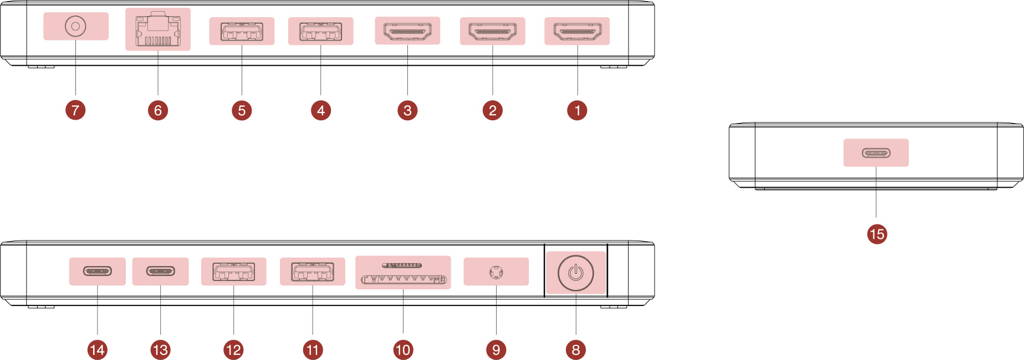
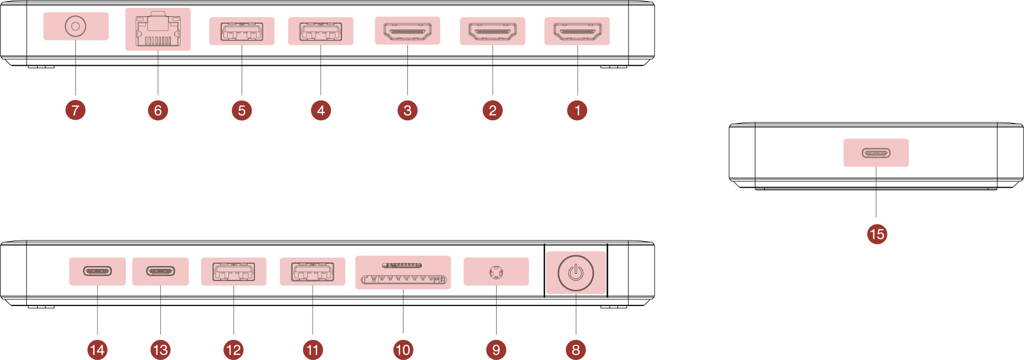
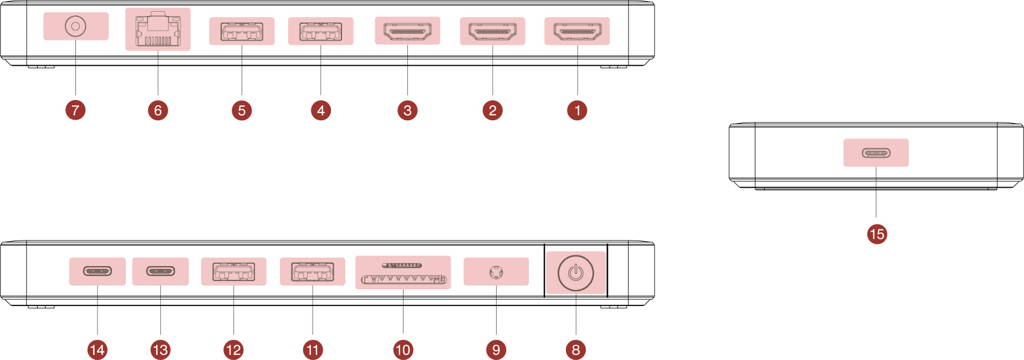
Step 7: If the dock can charge the Mac normally and ports 4, 5, and 13 work correctly, then please replace the HDMI cable and try again.
If the previously mentioned methods don’t resolve your issue, we kindly ask you to provide detailed information on macOS version, malfunctioning devices, and device models, preferably with relevant purchase links. We need to confirm whether there are compatibility issues. Please contact iVANKY customer support for further assistance.
Feedback format reference:
MacBook model: MacBook Pro 14 M2 Max 2023
macOS: Ventura 14.4.1
1.2 No video output when using HDMI 1
1. Check accessories and connections
Step 1: Ensure that the power cable is connected to the dock. Press the dock’s power button and check if the light turns on. If it does not, please contact our after-sales team.

Step 2: If you are using a converter cable with the iVANKY FusionDock Pro 1, to avoid cable quality issues, switch to an HDMI 2.0 or higher version video cable. Then ensure the video cable is connected to the monitor and remains secure.
Step 3: Use the included USB-C cable to connect the dock’s interface to the Mac’s USB-C interface, ensuring it is firmly connected.
Step 4: Flip the USB-C cable connected to the computer and re-plug it.
Step 5: Try connecting to another Thunderbolt port on the Mac.
Step 6: In the upper-left Apple menu, go to “System Settings”, click on “Displays”. If the external monitor is recognized but displays no image, replace the HDMI cable. If the issue persists, report to iVANKY customer support.
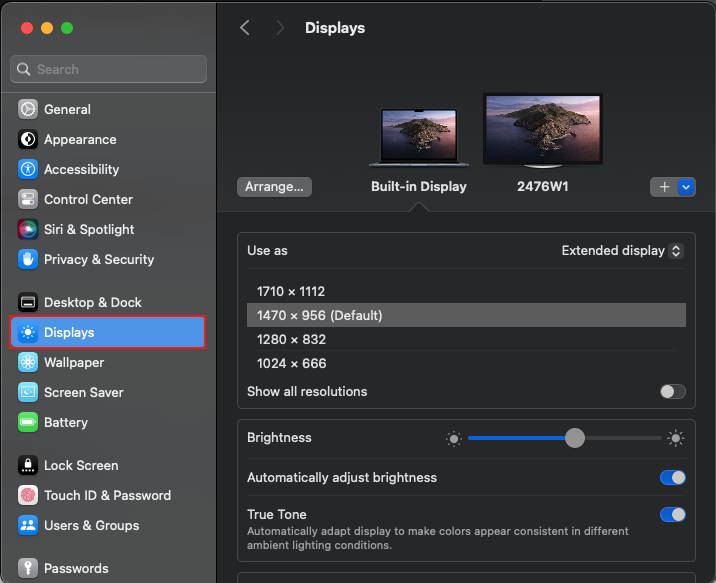
Step 7: As ports 4, 5, and 1 share the same output source, please check if ports 4 and 5 are functional to further confirm if the board is damaged.
2. Allow docking station connection
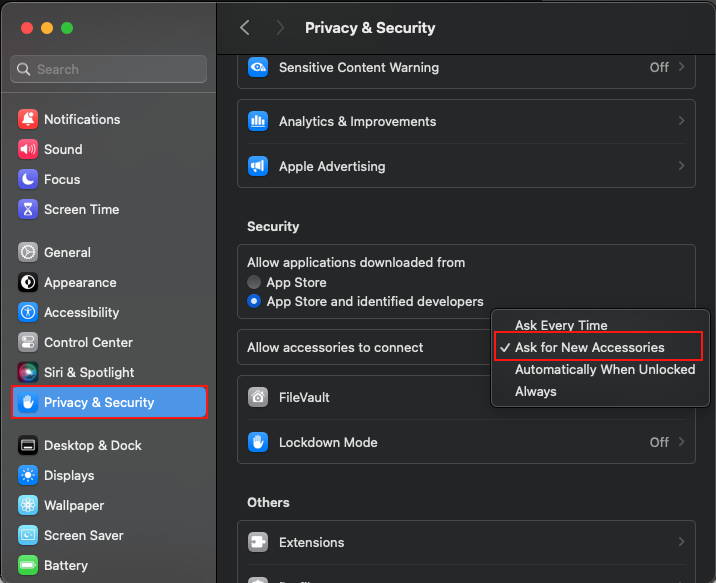
Step 1: Select the upper-left Apple menu icon, go to “System Settings”, choose “Privacy & Security”.
Step 2: Scroll down and click the pop-up menu next to “Allow accessories to connect”, then select “Ask for New Accessories”.
3. External monitor detection
Step 1: Disconnect the monitor from the docking station and reconnect.
Step 2: If experiencing a black screen on your external monitor, ensure the “Brightness” is not set too low.
Step 3: If using an Apple keyboard and monitor, use the keyboard’s brightness keys. Alternatively, select the upper-left Apple menu icon, go to “System Settings”, click on “Displays”, and use the brightness control.
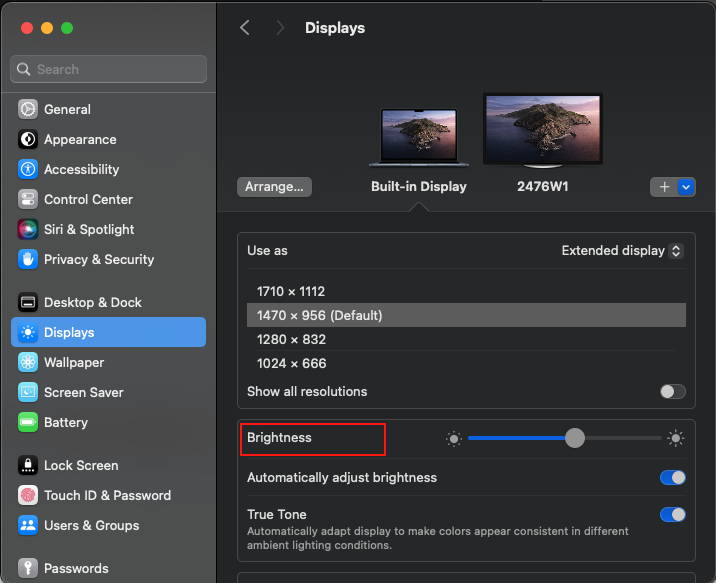
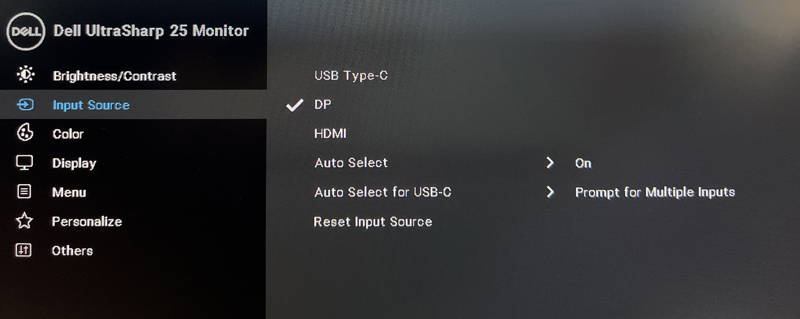
Step 4: If your external monitor is not made by Apple, you may need to use its built-in controls and menu system to adjust the brightness. If you cannot adjust the brightness and the monitor remains black, the monitor may not be powered on or may be malfunctioning.
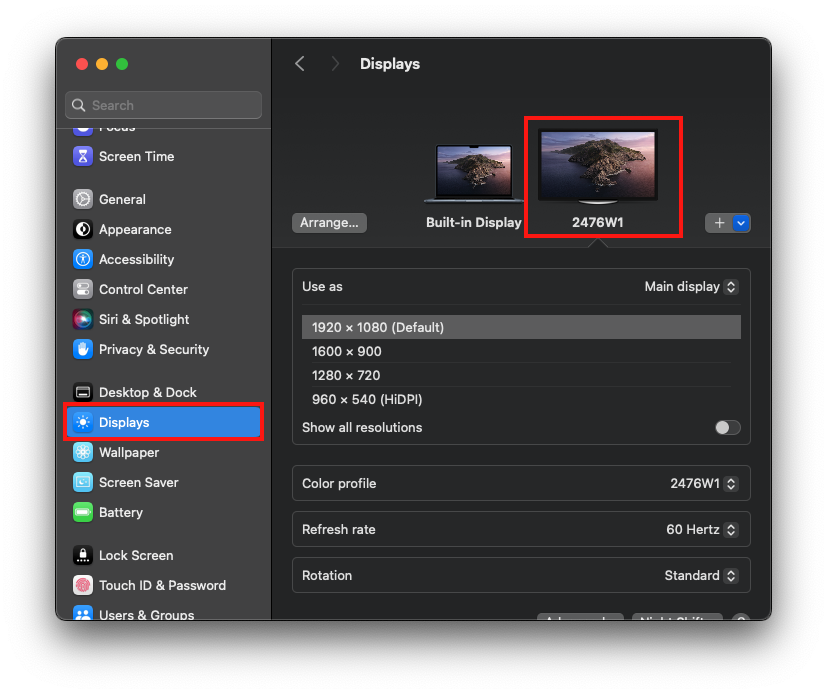
Step 5: Restart the Mac, click the Apple icon in the upper-left corner, go to “System Settings” (or “System Preferences”), click “Displays”, hold the Option key to show the “Detect Displays” button, and then repeatedly press this button more than 10 times.

4. Software update
Software may affect monitor detection, image quality, and available resolutions and refresh rates.
Install the latest macOS updates, as these updates can provide firmware updates for Apple-made monitors.
If your monitor is not an Apple brand, ensure it is using the latest firmware provided by the manufacturer. Refer to the monitor’s documentation or the manufacturer’s website for details.
If the previously mentioned methods don’t resolve your issue, we kindly ask you to provide detailed information on macOS version, malfunctioning devices, and device models, preferably with relevant purchase links. We need to confirm whether there are compatibility issues. Please contact iVANKY customer support for further assistance.
1.3 No video output when using HDMI 2+HDMI 3
1. Check accessories and connections
Step 1: Ensure that the power cable is connected to the dock. Press the dock’s power button and check if the light turns on. If it does not, please contact our after-sales team.

Step 2: Make sure the video cable is connected to the monitor and is secure.
Step 3: Use the provided USB-C cable to connect the dock’s USB-C port to the Mac’s USB-C port and ensure it is firmly connected.
Step 4: Flip the USB-C cable connected to the computer and re-plug it.
Step 5: Try connecting to another Thunderbolt port on the Mac.
Step 6: In the upper-left Apple menu, go to “System Settings”, click on “Displays”. If the external monitor is recognized but displays no image, replace the HDMI cable. If the issue persists, report to iVANKY customer support.
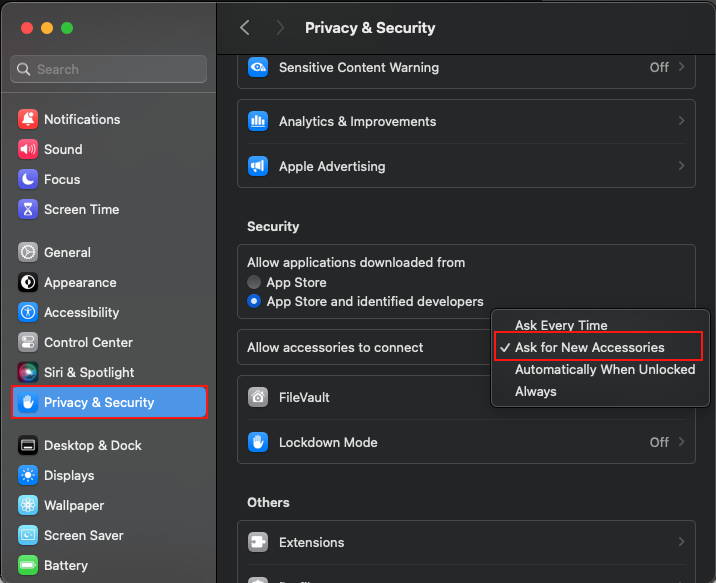
2. Allow docking station connection
Step 1: Select the upper-left Apple menu icon, go to “System Settings”, choose “Privacy & Security”.
Step 2: Scroll down and click the pop-up menu next to “Allow accessories to connect”, then select the desired option. Learn more about these options.
3. External monitor detection
Step 1: Disconnect the monitor from the docking station and reconnect.
Step 2: If experiencing a black screen on your external monitor, ensure the “Brightness” is not set too low.
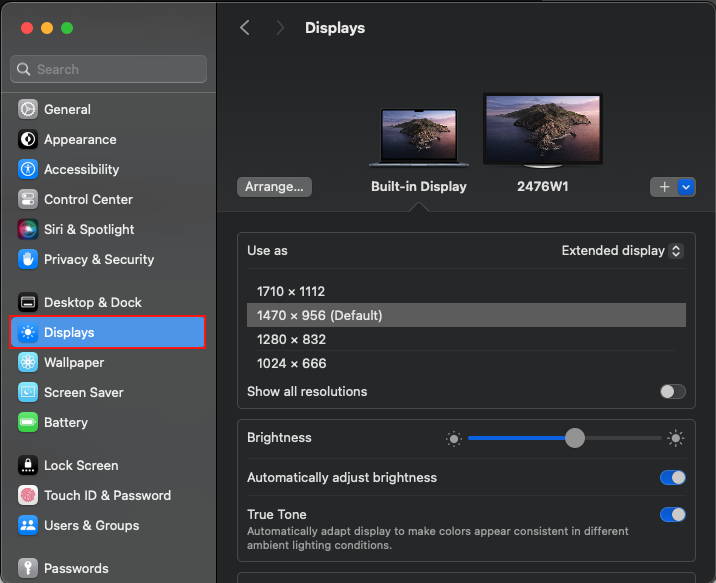
Step 3: If using an Apple keyboard and monitor, use the keyboard’s brightness keys. Alternatively, select the upper-left Apple menu icon, go to “System Settings”, click on “Displays”, and use the brightness control.
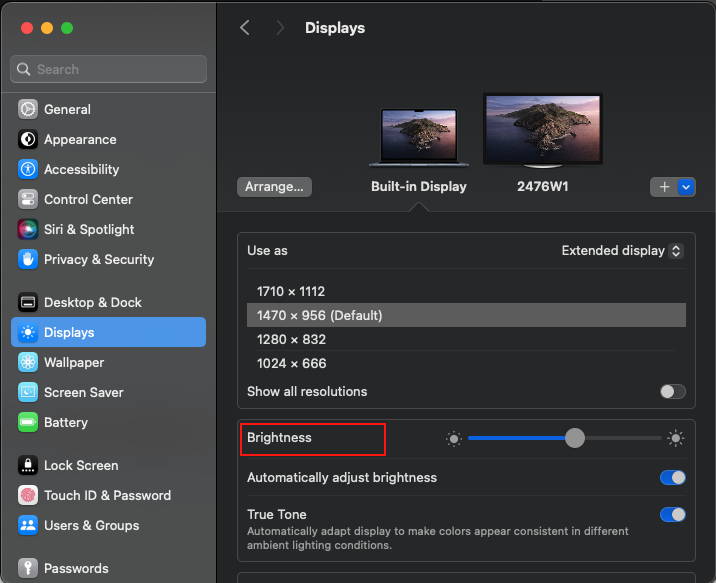
Step 4: If your external monitor is not made by Apple, you may need to use its built-in controls and menu system to adjust the brightness. If you cannot adjust the brightness and the monitor remains black, the monitor may not be powered on or may be malfunctioning.

Step 5: Restart the Mac, click the Apple icon in the upper-left corner, go to “System Settings” (or “System Preferences”), click “Displays”, hold the Option key to show the “Detect Displays” button, and then repeatedly press this button more than 10 times.
Step 6: Update your software.
Software may affect monitor detection, image quality, and available resolutions and refresh rates.
Install the latest macOS updates, as these updates can provide firmware updates for Apple-made monitors.
If your monitor is not an Apple brand, ensure it is using the latest firmware provided by the manufacturer. Refer to the monitor’s documentation or the manufacturer’s website for details.
4. DL-6950 driver detection
Step 1: Check if the Mac system version and the DL-6950 driver are compatible. Refer to the official driver description for details. If macOS is Monterey 12 or above, update the DL-6950 driver to the latest version and follow the official instructions for installation to complete the version: https://ivanky.com/pages/troubleshoot-your-fusiondock-pro-1
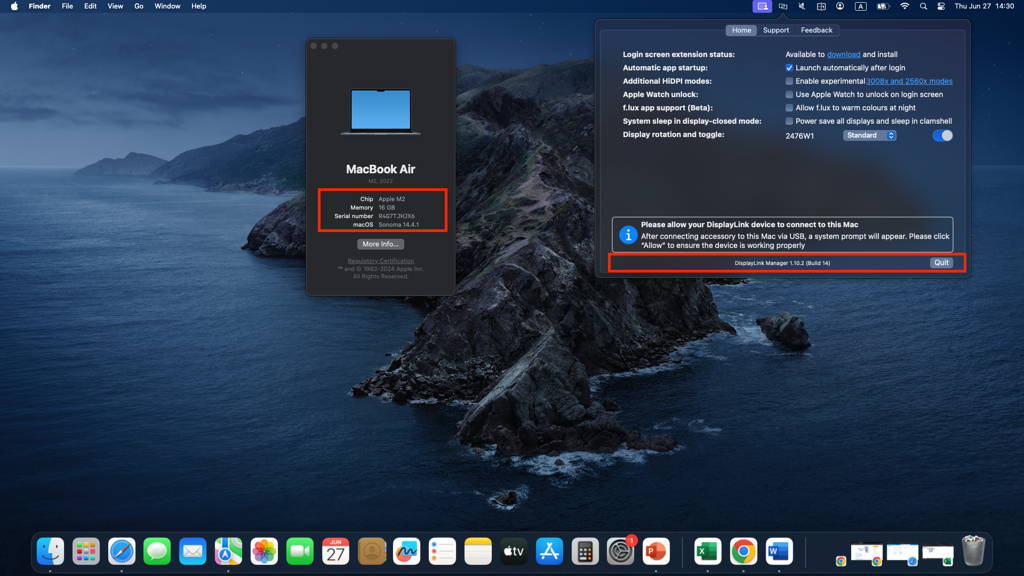
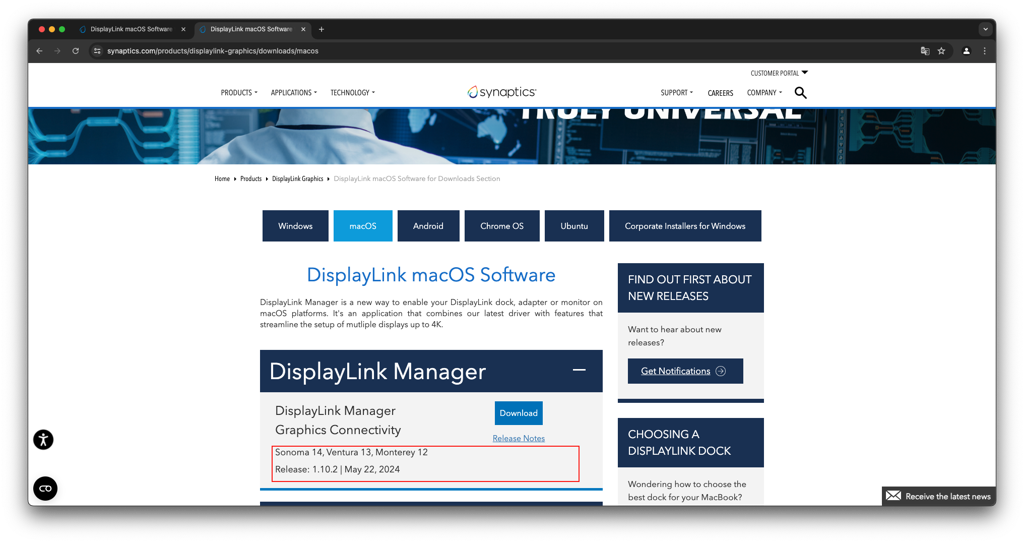
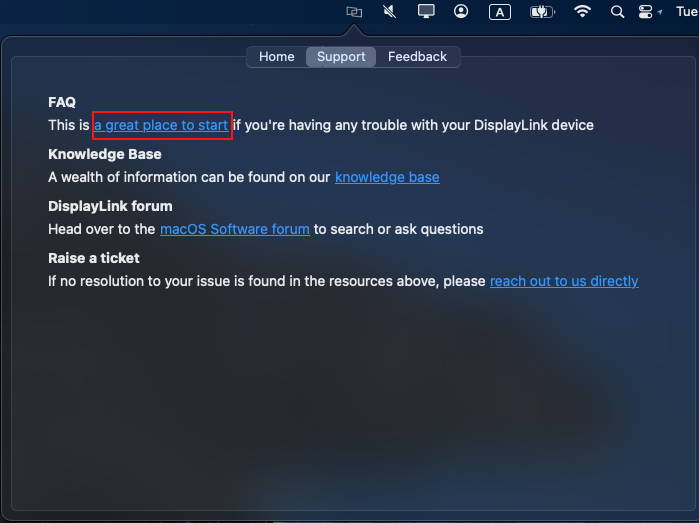
Step 2: If there is an exclamation mark prompt in DisplayLink Manager as shown in the figure, please go to “Privacy & Security” to enable DisplayLink Manager permissions.
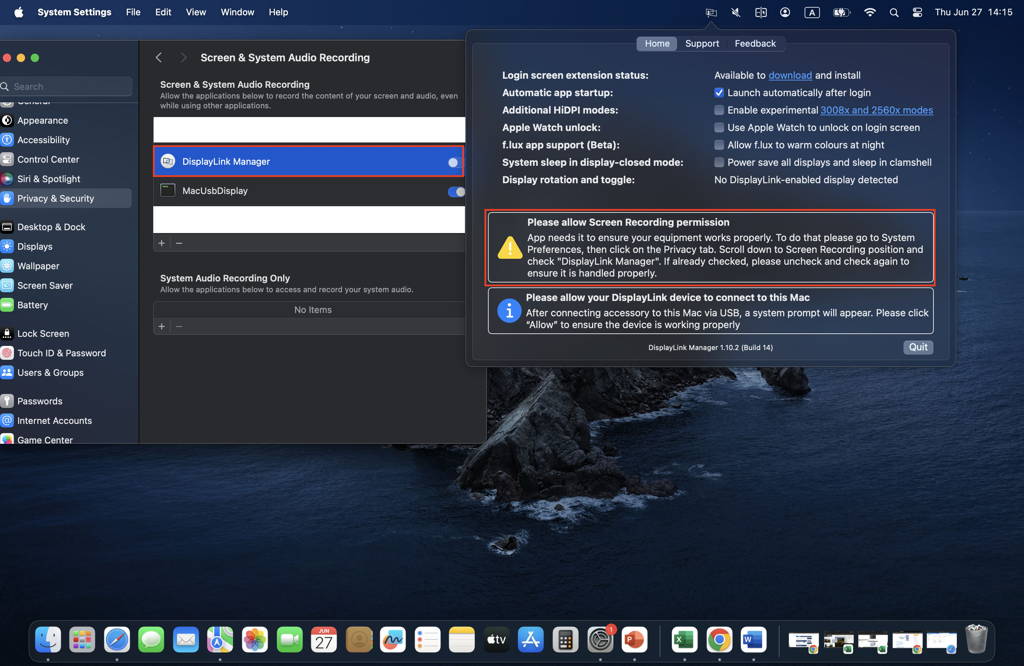
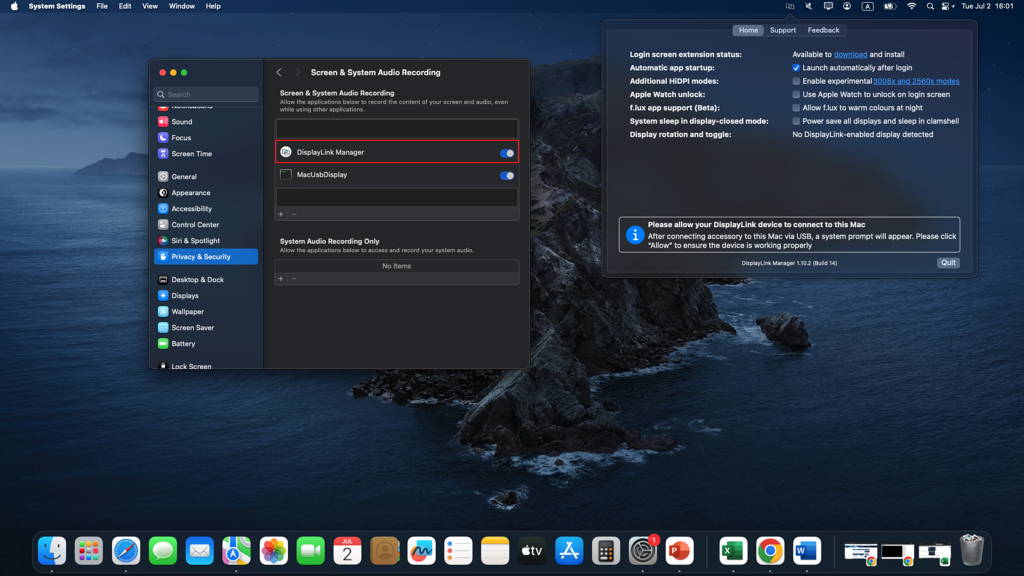
Step 3: DisplayLink Manager permissions have been enabled, but after opening the driver interface, the monitor is not detected. At this point, since ports 1, 2, and 9 share the same output source, please check if port 9 can be used normally to further confirm if the board is damaged.
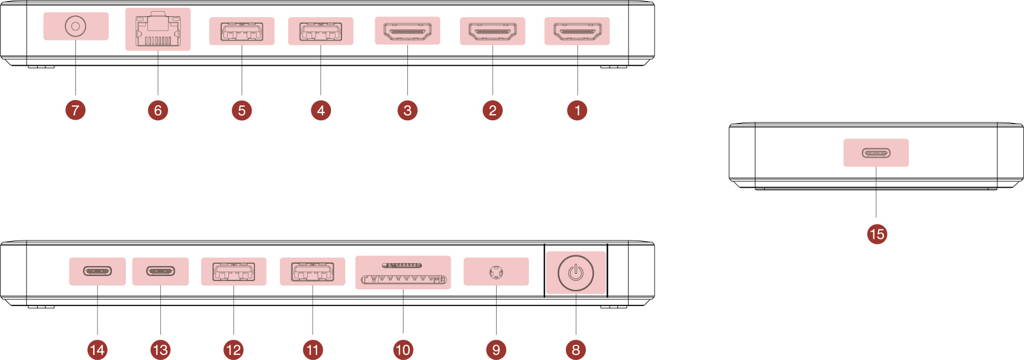
Step 4: If port 9 can be used normally and the docking station can charge the Mac normally, but only HDMI 2 and HDMI 3 cannot project the screen normally, please try replacing the HDMI cable. If it still does not work, follow the picture instructions to submit the relevant issue to DisplayLink Manager. You can seek help from the DisplayLink official website.
If the previously mentioned methods don’t resolve your issue, we kindly ask you to provide detailed information on macOS version, malfunctioning devices, and device models, preferably with relevant purchase links. We need to confirm whether there are compatibility issues. Please contact iVANKY customer support for further assistance.
Feedback format reference:
MacBook model: MacBook Pro 14 M2 Max 2023
macOS: Ventura 14.4.1
DL-6950 version: 1.10.2
1.4 Screen flickering when using HDMI 1
1. Check accessories and connections
Step 1: Make sure the video cable is connected to the monitor and is secure.
Step 2: Use the provided USB-C cable to connect the dock’s USB-C port to the Mac’s USB-C port and ensure it is firmly connected.
Step 3: Flip the dock’s USB-C cable connecting to the computer and reinsert it into the computer.
Step 4: If you are using a third-party HDMI to VGA/DP to HDMI cable, replace the HDMI cable and try again. It is recommended to use an iVANKY HDMI cable rather than other third-party cables.
Step 5: If you are using a KVM or USB-C extension cable with the iVANKY FusionDock Pro 1, it may cause the dock signal to be lost. Please use the original USB-C cable provided with the dock.
If the above steps do not resolve your issue, please troubleshoot according to the following scenarios:
Scenario 1: The screen goes blank/black for about a second, then turns back on, and the windows on the monitor do not move to another monitor. This is due to the video output from the monitor not being in sync with the video output from the iVANKY FusionDock Pro 1, such as a long or poor-quality video cable. Please replace the HDMI cable with an iVANKY HDMI cable to confirm.
If the problem persists after replacing the iVANKY HDMI cable, please purchase a Cable Ring that supports EMI interference. If you are unsure about the EMI interference Cable Ring, please contact iVANKY customer service, and we will provide timely advice.
Scenario 2: The screen frequently goes black, the Mac detects the external monitor, but no image is displayed or the screen goes black, causing it to be unusable. Please try a different model of the monitor to confirm; the monitor may need repair.
Scenario 3: The screen goes blank/black for about a second, then turns back on, and all the windows on the monitor transfer to the Mac display. This may be due to a signal loss between the laptop and the iVANKY FusionDock Pro 1. Please replace it with another compliant USB4 cable & Thunderbolt cable, such as an Apple original Thunderbolt cable, or contact iVANKY after-sales service to replace it with a compliant Thunderbolt cable.
If the previously mentioned methods don’t resolve your issue, we kindly ask you to provide detailed information on macOS version, malfunctioning devices, and device models, preferably with relevant purchase links. We need to confirm whether there are compatibility issues. Please contact iVANKY customer support for further assistance.
Feedback format reference:
MacBook model: MacBook Pro 14 M2 Max 2023
macOS: Ventura 14.4.1
DL-6950 version: 1.10.2
1.5 Screen flickering when using HDMI 2+HDMI 3
1. Check accessories and connections
Step 1: Make sure the video cable is connected to the monitor and is secure.
Step 2: Use the provided USB-C cable to connect the dock’s USB-C port to the Mac’s USB-C port and ensure it is firmly connected.
Step 3: Flip the dock’s USB-C cable connecting to the computer and reinsert it into the computer.
Step 4: If you are using a third-party HDMI to VGA/DP to HDMI cable, replace the HDMI cable and try again. It is recommended to use an iVANKY HDMI cable rather than other third-party cables.
Step 5: If you are using a KVM or USB-C extension cable with the iVANKY FusionDock Pro 1, it may cause the dock signal to be lost. Please use the original USB-C cable provided with the dock.
If the above steps do not resolve your issue, please troubleshoot according to the following scenarios:
Scenario 1: The screen goes blank/black for about a second, then turns back on, and the windows on the monitor do not move to another monitor. This is due to the video output from the monitor not being in sync with the video output from the iVANKY FusionDock Pro 1, such as a long or poor-quality video cable. Please replace the HDMI cable with an iVANKY HDMI cable to confirm.
If the problem persists after replacing the iVANKY HDMI cable, please purchase a Cable Ring that supports EMI interference. If you are unsure about the EMI interference Cable Ring, please contact iVANKY customer service, and we will provide timely advice.
Scenario 2: The screen frequently goes black, the Mac detects the external monitor, but no image is displayed or the screen goes black, causing it to be unusable. Please try a different model of the monitor to confirm; the monitor may need repair.
Scenario 3: The screen goes blank/black for about a second, then turns back on, and all the windows on the monitor transfer to the Mac display. This may be due to a signal loss between the laptop and the iVANKY FusionDock Pro 1. Please replace it with another compliant USB4 cable & Thunderbolt cable, such as an Apple original Thunderbolt cable, or contact iVANKY after-sales service to replace it with a compliant Thunderbolt cable.
2. Detect video signal interference
Step 1: Please temporarily enable airplane mode or disable Wi-Fi, as it is known that some wireless cards can interfere with the video signal.
Step 2: Disconnect all devices connected to the Mac (except for the iVANKY FusionDock Pro 1); meanwhile, only keep HDMI 2 & HDMI 3 connected to the monitor on the iVANKY FusionDock Pro 1 and observe if the display is normal.
Feedback format reference:
MacBook model: MacBook Pro 14 M2 Max 2023
macOS: Ventura 14.4.1
DL-6950 version: 1.10.2
2.USB Ports Issues
2.1 USB-C port not working
Step 1: Observe if the docking station’s LED light is on.
Step 2: Ensure the USB-C device is turned on and its cable is properly connected. If your device has multiple USB-C ports, connect the device’s cable to another USB-C port.
Step 3: If the device works after changing the port, connect another device to the port that has been tested. If the device does not work, shut down the computer and unplug the power cord. Wait for one minute, then plug the power cord back into the power outlet and start the computer.
Step 4: Try plugging the device directly into the computer’s USB-C port to confirm the device is functioning properly.
Step 5: Disconnect all USB devices except for the one you are testing. If the device now works, the problem may be with one of the devices connected to the docking station. Try reconnecting them to the docking station one by one.
Step 6: Unplug the connection between the dock and the Mac, and disconnect the dock’s power adapter. Wait for one minute, then reconnect the power adapter.
If the previously mentioned methods don’t resolve your issue, we kindly ask you to provide detailed information on macOS version, malfunctioning devices, and device models, preferably with relevant purchase links. We need to confirm whether there is a compatibility issue with the external device. Please contact the iVANKY customer service team for assistance.
If individual ports are not working, please provide feedback in the following format:
Port 13/14 not working
MacBook model: MacBook Pro 14 M2 Max 2023
macOS: Ventura 14.4.1
DL-6950 version: 1.10.2
2.2 USB-A port not working
Step 1: Observe if the docking station’s LED light is on.
Step 2: Ensure the USB-A device is turned on and its cable is properly connected. If your device has multiple USB-A ports, connect the device’s cable to another USB-A port.
Step 3: If the device works after changing the port, connect another device to the first port. If the device does not work, shut down the computer and unplug the power cord. Wait for one minute, then plug the power cord back into the power outlet and start the computer.
Step 4: Try plugging the device directly into the computer’s USB-A port to confirm the device is functioning properly.
Step 5: Disconnect all USB devices except for the one you are testing. If the device now works, the problem may be with one of the devices connected to the docking station. Try reconnecting them to the docking station one by one.
Step 6: Unplug the connection between the dock and the Mac, and disconnect the dock’s power adapter. Wait for one minute, then reconnect the power adapter.
If the previously mentioned methods don’t resolve your issue, we kindly ask you to provide detailed information on macOS version, malfunctioning devices, and device models, preferably with relevant purchase links. We need to confirm whether there is a compatibility issue with the external device. Please contact the iVANKY customer service team for assistance.
If individual ports are not working, please provide feedback in the following format:
Port 13/14 not working
MacBook model: MacBook Pro 14 M2 Max 2023
macOS: Ventura 14.4.1
DL-6950 version: 1.10.2
3.Network Connectivity Issues
3.1 Unable to connect to the network
1. Check wiring and connections
Step 1: Observe if the LED docking station’s light is on
Step 2: Please unplug and reconnect the cable connecting the device and the dock / USB-C cable between the dock and Mac / DC power.
Step 3: Please unplug and reconnect the Ethernet cable to the dock. Under normal circumstances, you can see a steady green light and a flashing orange light inside the Ethernet port. If the light is flickering abnormally or there is no light, try using other network connection devices to confirm whether the Ethernet port is functioning properly.
Step 4: Shine the phone flashlight on the docking station's Ethernet port, check if there is damage to the socket such as bent or deformed PINs. If PINs are found to be deformed or recessed, use a toothpick or similar sharp needle to correct the PINs to their normal state. If the docking station port is damaged causing the network cable to loosen, you can use tape or other external items to fix it, or contact iVANKY customer service for replacement.
Step 5: Ensure macOS is up-to-date and all Mac software is the latest version.
Step 6: Update the Mac network driver, details can be found on the iVANKY official website link: https://ivanky.com/blogs/news/ivanky-ethernet-driver-download-guide
Step 7: Click on the Apple icon on the top left corner, find “System Settings” > click on “Network” > you can see USB 10/100/1000 LAN & USB 10/100/1G/2.5G LAN > observe the light color below and choose the corresponding operation steps > if the network is not recognized, please go to the “Grey status indicator below the service name (no recognition of network access)” section.
2. Yellow status indicator below the service name (self-assigned IP)
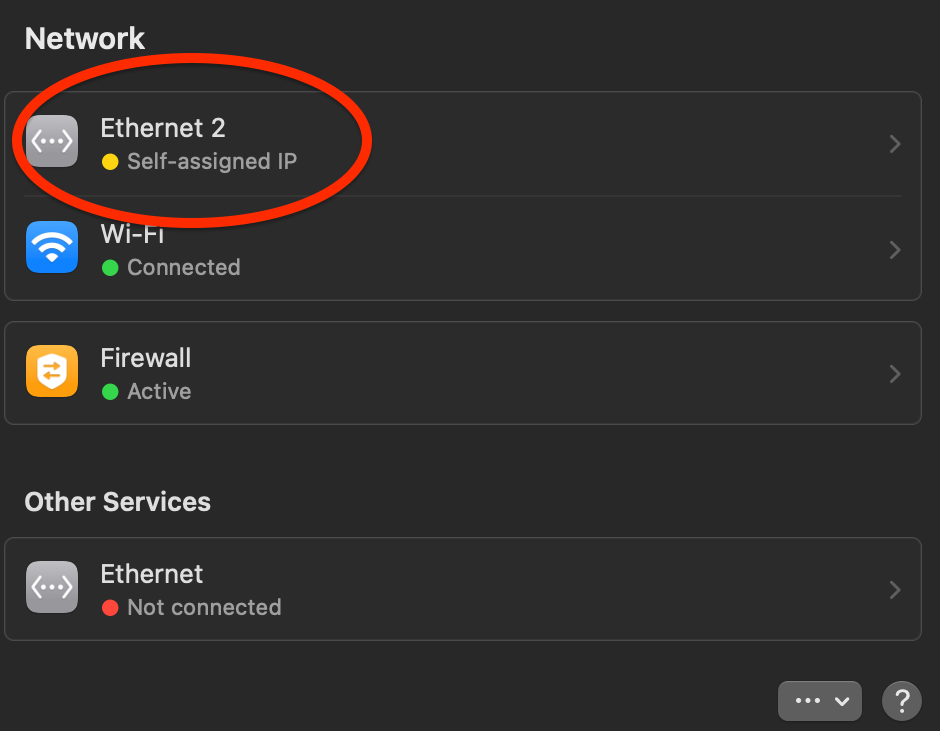
Step 1: Restart the computer to reassign the IP address.
Step 2: Connect the Ethernet cable directly to another device (such as a desktop computer or a laptop with a network port) to test if the network cable is working normally.
Step 3: Turn off the optical modem or router and wait for 5 minutes, then turn it on again to reassign the IP address.
Step 4: Replug the network cable to reassign the IP address.
Step 5: Reset the router to reassign the IP address.
3. Grey status indicator below the service name (no recognition of network access)
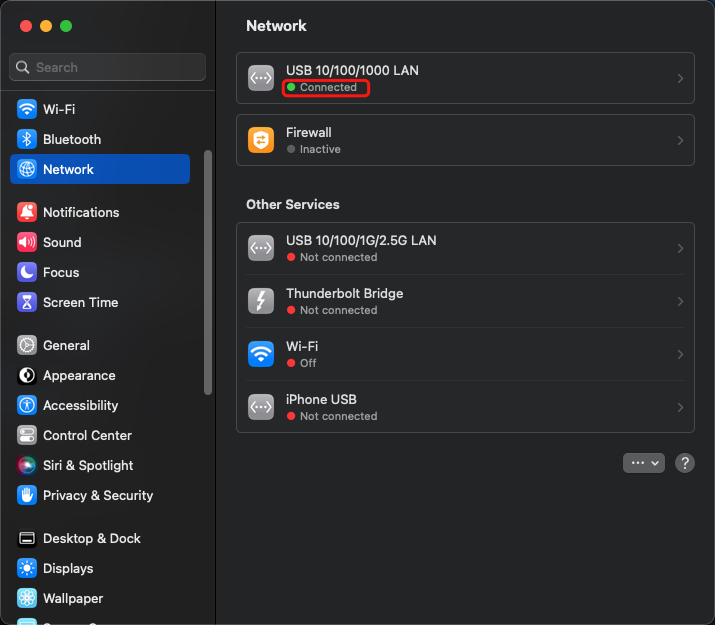
Step 1: Connect the network cable directly to another device (such as a desktop computer or a laptop with a network port) to test if the network cable is working normally.
Step 2: Add a new user, restart and login on your Mac as the new user, test for non-recognition of the network due to software conflicts on the computer.
4. Green status indicator (connected but not working)
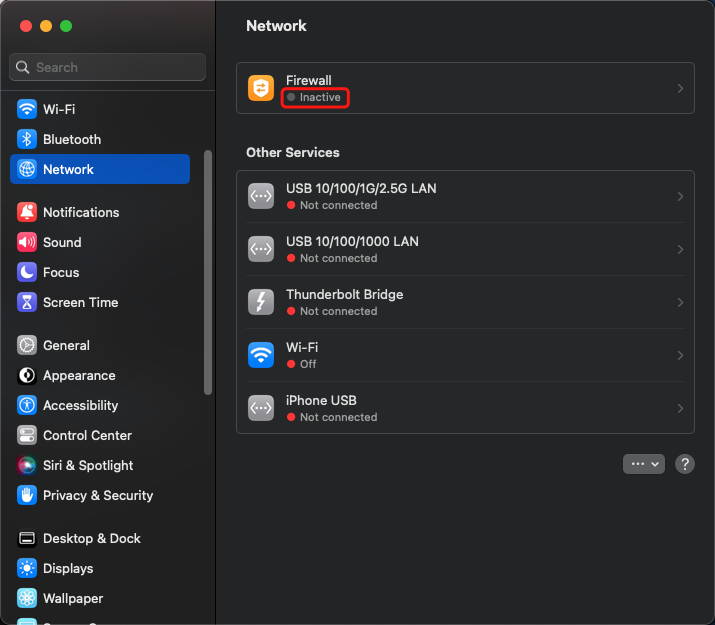
Step 1: Replug the network cable.
Step 2: Connect the network cable directly to another device (such as a desktop computer or a laptop with a network port) to test if the network cable is working normally.
Step 3: If conditions permit, try replacing the network cable.
If the previously mentioned methods don’t resolve your issue, we kindly ask you to provide detailed information on macOS version, malfunctioning devices, and device models, preferably with relevant purchase links. We need to confirm whether there are compatibility issues. Please contact iVANKY customer support for further assistance.
Feedback format reference:
MacBook model: MacBook Pro 14 M2 Max 2023
macOS: Ventura 14.4.1
DL-6950 version: 1.10.2
3.2 Slow Internet speed
1. Check accessories and connections
Step 1: Restart the Mac and ensure that both the dual USB-C cable and Ethernet cable at both ends are correctly connected and firmly connected.
Step 2: Replug the accessories connecting the Mac and the monitor. If necessary, try flipping the USB-C cable connecting the docking station to the Mac and reinserting the Ethernet cable.
Step 3: Directly connect the Ethernet cable to the Mac or establish a Wi-Fi connection to see if the Internet speed has returned to normal.
Step 4: Unplug all devices except the Ethernet from the docking station. On the router side, unplug all devices and only keep the network cable connected to the docking station interface. If there is a problem, try using another WAN interface on the router for testing.
Step 5: Inquire with the network cable seller to check if the current cable supports gigabit network. Under normal network testing conditions, check if the network cable can meet the requirements of ≥800MB/s. If there are other network-connected devices, try connecting the router network cable to that device to confirm whether the router and network cable can meet the requirements of gigabit network speed. If it cannot meet, please contact the network cable seller for cable replacement.
2. Restart the router
Step 1: Unplug the router and Ethernet cable and wait for at least 30 seconds.
Step 2: Reconnect the Ethernet cable to the router.
Step 3: Once the Internet indicator light is on (normally, you can see a constant green light and a blinking orange light at the network port), check if the Internet connection is normal on your Mac.
3. Update software
Step 1: Ensure macOS is up-to-date and all Mac software is the latest version.
Step 2: Update the Mac network driver, details can be found on the iVANKY official website link: https://ivanky.com/blogs/news/ivanky-ethernet-driver-download-guide
If the previously mentioned methods don’t resolve your issue, we kindly ask you to provide detailed information on macOS version, malfunctioning devices, and device models, preferably with relevant purchase links. We need to confirm whether there are compatibility issues. Please contact iVANKY customer support for further assistance.
Feedback format reference:
MacBook model: MacBook Pro 14 M2 Max 2023
macOS: Ventura 13.3.1
DL-6950 version: 1.10.2
Ethernet cable purchase link: XX
3.3 Frequent disconnection
1. Check accessories and connections
Step 1: Restart the Mac and ensure that both the dual USB-C cable and Ethernet cable at both ends are correctly connected and firmly connected.
Step 2: Ensure macOS is up to date and all Mac software is at the latest version. First, close all other software but keep only the Google Chrome running. Then, test for any conflicts causing disconnections between Google Chrome and other applications. If the network remains connected with only Google Chrome running, please contact the iVANKY customer service team.
Step 3: Click on the top left corner, find “System Settings” > click on “Network” > you can see “USB 10/100/1000 LAN & USB 10/100/1G/2.5G LAN” > observe whether it repeatedly connects.

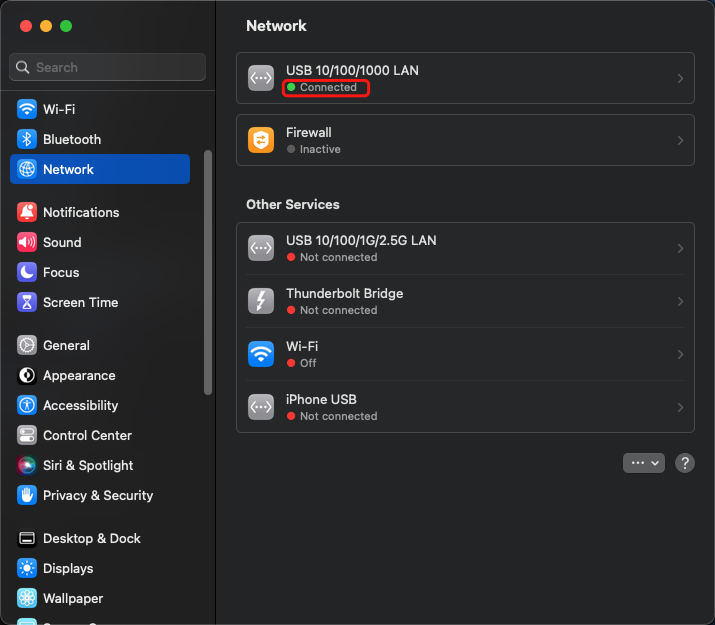
Step 4: Shine the phone flashlight on the docking station's RJ45 socket, check if there is damage to the socket such as bent or deformed PINs. If PINs are found to be deformed or recessed, use a toothpick or similar sharp needle to correct the PINs to their normal state. If the docking station port is damaged causing the network cable to loosen, you can use tape or other external items to fix it, or contact iVANKY customer service for replacement.
Step 5: Connect the network cable directly to another device (such as a desktop computer or a laptop with a network port) to test if disconnection occurs.
Step 6: Please try replacing the network cable.
2. Network environment check
Step 1: Restart the computer to reassign the IP address.
Step 2: Turn off the optical modem or router and wait for 5 minutes, then turn it on again to reassign the IP address.
Step 3: Replug the network cable to reassign the IP address.
3. Update software
Step 1: Ensure macOS is up-to-date and all Mac software is the latest version.
Step 2: Update the Mac network driver, details can be found on the iVANKY official website link: https://ivanky.com/blogs/news/ivanky-ethernet-driver-download-guide
If the previously mentioned methods don’t resolve your issue, we kindly ask you to provide detailed information on macOS version, malfunctioning devices, and device models, preferably with relevant purchase links. We need to confirm whether there are compatibility issues. Please contact iVANKY customer support for further assistance.
Feedback format reference:
MacBook model: MacBook Pro 14 M2 Max 2023
macOS: Ventura 13.3.1
DL-6950 version: 1.10.2
4.Charging Issues
4.1 Unable to charge Mac
1. Check power supply equipment
Step 1: Observe if the docking station’s LED light is on.

Step 2: Ensure you are using the original USB-C cable provided with the dock to connect port 15 on the dock with the Mac Thunderbolt port.
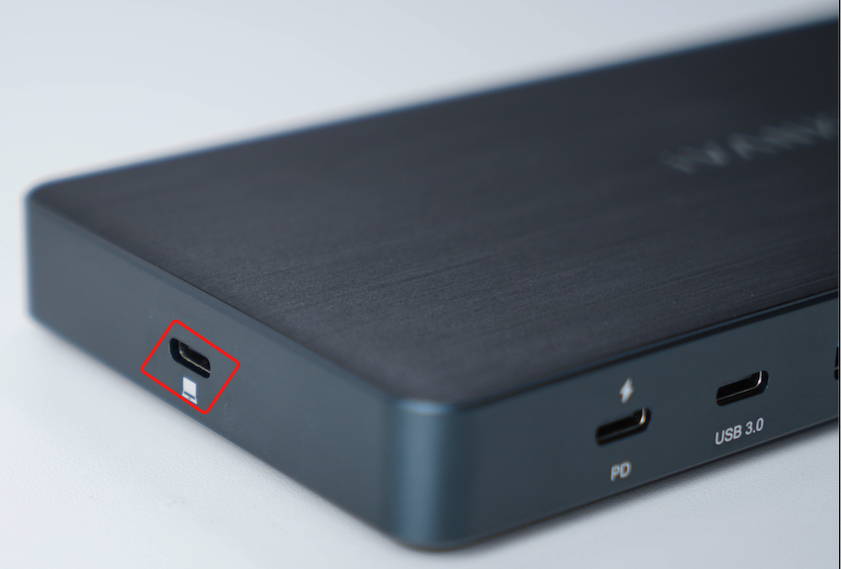
Step 3: Restart the Mac and reconnect the USB-C cable between the dock and the Mac.
Step 4: Unplug the dock’s power adapter from the power outlet, wait for 10 seconds, then reconnect.
Step 5: Try using the Mac’s original PD Charger to confirm if the Mac’s Thunderbolt port can charge properly.
2. Test power outlet
Step 1: Unplug the dock’s power adapter from the power outlet and plug a known good device (e.g., a lamp) into the outlet to confirm it can power devices. If the power outlet works properly, observe if the dock’s power adapter LED light is on, noting that button 7 is the dock's power switch button.
Step 2: Try using port 14 (USB-C interface) to charge a phone/tablet to test if it can charge normally.
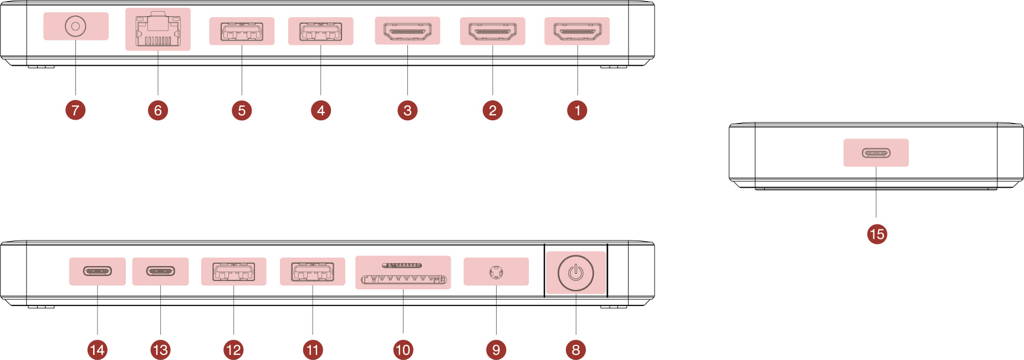
If the previously mentioned methods don’t resolve your issue, we kindly ask you to provide detailed information on macOS version, malfunctioning devices, and device models, preferably with relevant purchase links. We need to confirm whether there are compatibility issues. Please contact iVANKY customer support for further assistance.
Feedback format reference:
MacBook model: MacBook Pro 14 M2 Max 2023
macOS: Ventura 14.4.1
DL-6950 version: 1.10.2
Port 14 can/cannot charge XX device.
Button 7 can/cannot function properly.
4.2 PD out port not working
Step 1: Observe if the docking station’s LED light is on.
Step 2: Please unplug and reconnect the cable connecting the device and the dock / USB-C cable between the dock and Mac/DC power.
Step 3: Insert a known good device with a USB-C interface to test if the port 14 (PD interface) is working normally.
Step 4: Replace the USB-C cable and reconnect to test if the cable is faulty.
Step 5: Test another USB-C port to see if it works normally.
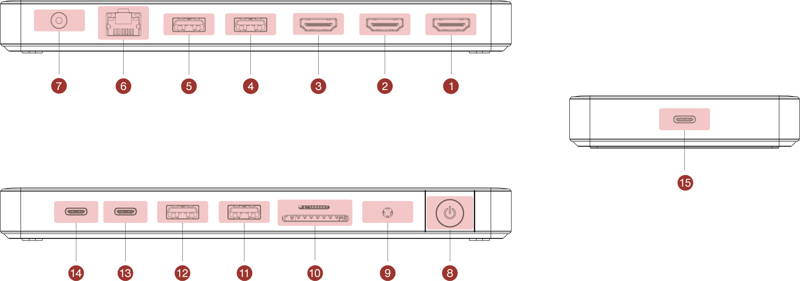
If the previously mentioned methods don’t resolve your issue, we kindly ask you to provide detailed information on macOS version, malfunctioning devices, and device models, preferably with relevant purchase links. We need to confirm whether there is a compatibility issue with the external device. Please contact the iVANKY customer service team for assistance.
If individual ports are not working, please provide feedback in the following format:
Port 13/14 not working
MacBook model: MacBook Pro 14 M2 Max 2023
macOS: Ventura 14.4.1
DL-6950 version: 1.10.2
5.Audio Ports Issues
5.1: 3.5mm audio port has no sound output
1. Check wiring and connections
Step 1: Reverse and reconnect the USB-C cable between the dock and Mac’s Thunderbolt port, then restart the Mac.
Step 2: Unplug the connection between the dock and the Mac, and disconnect the dock’s power adapter. Wait for 1 minute, then reconnect.
Step 3: Plug the 3.5mm device directly into the Mac’s 3.5mm port or another known good 3.5mm port.
Step 4: Ensure the dock’s 3.5mm audio port is clean and free of debris. Use compressed air to clean if necessary.
2. Check sound settings
Step 1: For troubleshooting, please disconnect every connected device from the docking station, leaving only the audio cable, mouse, and keyboard connected.
Step 2: Choose the Apple menu, select “System Settings”, and click on “Sound.”
Step 3: Click on the “Output” tab and select the external speakers & headphones connected to the audio cable. If you don't see the built-in speaker option in the “Output” window, contact iVANKY customer support.
Step 4: If the “Output Volume” slider is set to a low volume, move the slider to the right and retest.
Step 5: If the “Mute” checkbox is selected, unselect it and retest.
Step 6: Open another app to play audio/video to confirm if the headphone output is functioning properly.
3. Check if the output source is damaged
Since port 9 shares the same output source as ports 1 and 2, check if port 9 can be used normally to further confirm if the board is damaged.
4. DL-6950 driver detection
Step 1: Check if the Mac system version and the DL-6950 driver are compatible. Refer to the official driver description for details. If macOS is Monterey 12 or above, update the DL-6950 driver to the latest version and follow the official instructions for installation to complete the version: https://ivanky.com/pages/troubleshoot-your-fusiondock-pro-1


Step 2: If there is an exclamation mark prompt in DisplayLink Manager as shown in the figure, please go to “Privacy & Security” to enable DisplayLink Manager permissions.

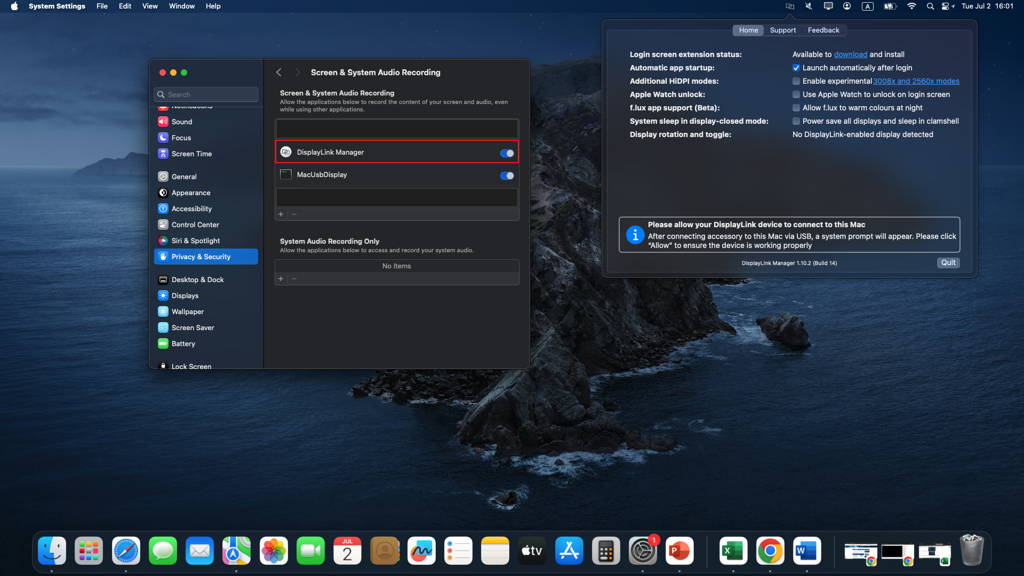
Step 3: DisplayLink Manager permissions have been enabled, but after opening the driver interface, the monitor is not detected. At this point, since ports 1, 2, and 9 share the same output source, please check if port 9 can be used normally to further confirm if the board is damaged.
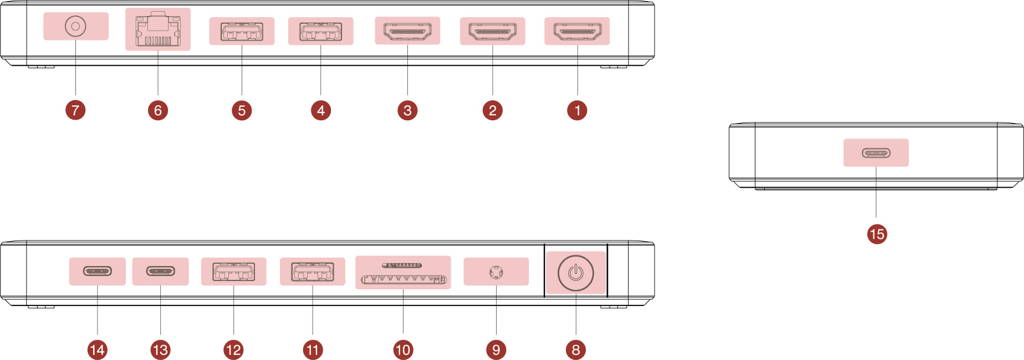
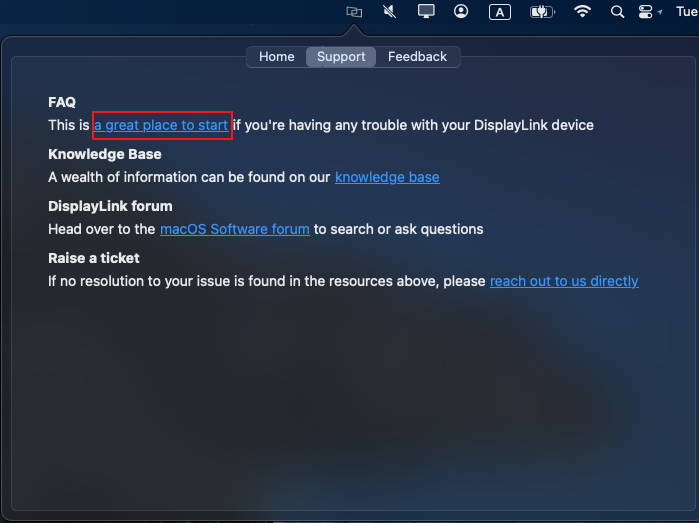
Step 4: If port 9 can be used normally and the docking station can charge the Mac normally, but only HDMI 2 and HDMI 3 cannot project the screen normally, please try replacing the HDMI cable. If it still does not work, follow the picture instructions to submit the relevant issue to DisplayLink Manager. You can seek help from the DisplayLink official website.
If the previously mentioned methods don’t resolve your issue, we kindly ask you to provide detailed information on macOS version, malfunctioning devices, and device models, preferably with relevant purchase links. We need to confirm whether there are compatibility issues. Please contact iVANKY customer support for further assistance.
Feedback format reference:
MacBook model: MacBook Pro 14 M2 Max 2023
macOS: Ventura 14.4.1
DL-6950 version: 1.10.2
6.SD/TF Card Slot Issues
6.1 SD/TF card not working
1. Check wiring and connections
Step 1: Observe if the docking station’s LED light is on.
Step 2: Please reconnect the cables between the device and the docking station/USB-C cable between the dock and Mac/DC power, and wait for 30 seconds.
Step 3: Confirm that the SD/TF port is clean and free of paper debris. If necessary, use compressed air to blow the SD/TF card slot.
Step 4: If conditions allow, try using another SD/TF card.
Step 5: If conditions allow, directly insert the SD/TF into the Mac to confirm if it can be used normally.
Step 6: Use a clean cloth soaked in alcohol to vigorously wipe the gold-plated connects of the SD/TF card before trying again.
2. Reinsert the card
Step 1: If the inserted card fails to load, take out the card and reinsert it. Please notice that insertion speed can impact its loading.
Step 2: If the card still cannot be loaded, please inform us of the macOS version, the malfunctioning device, and the device model, preferably with relevant purchase links. We need to confirm whether there is a compatibility issue with the external device. Please contact the iVANKY customer service team for assistance.
Feedback format reference:
MacBook model: MacBook Pro 14 M2 Max 2023
macOS: Ventura 13.3.1
SD/TF Card: SanDisk Extreme PRO SD UHS-I Card 128G
DL-6950 version: 1.10.2
Step 3: If you are unable to achieve normal output, kindly reach out to iVANKY support for assistance in resolving the issue or to inquire about a replacement.
7. Technical Support
If you encounter any issues while using the docking station please contact iVANKY technical support.
· Email: [email protected]
· Website: https://www.ivanky.com
When contacting iVANKY technical support for technical issues, please provide the following information:
· Your docking station serial number.
· Computer operating system and version.
· Computer manufacturer and model.
· Description of the issue and the devices connected to the dock.
