

- Set Up Video
- FAQs
- Manuals & Downloads
How to set up this docking station?
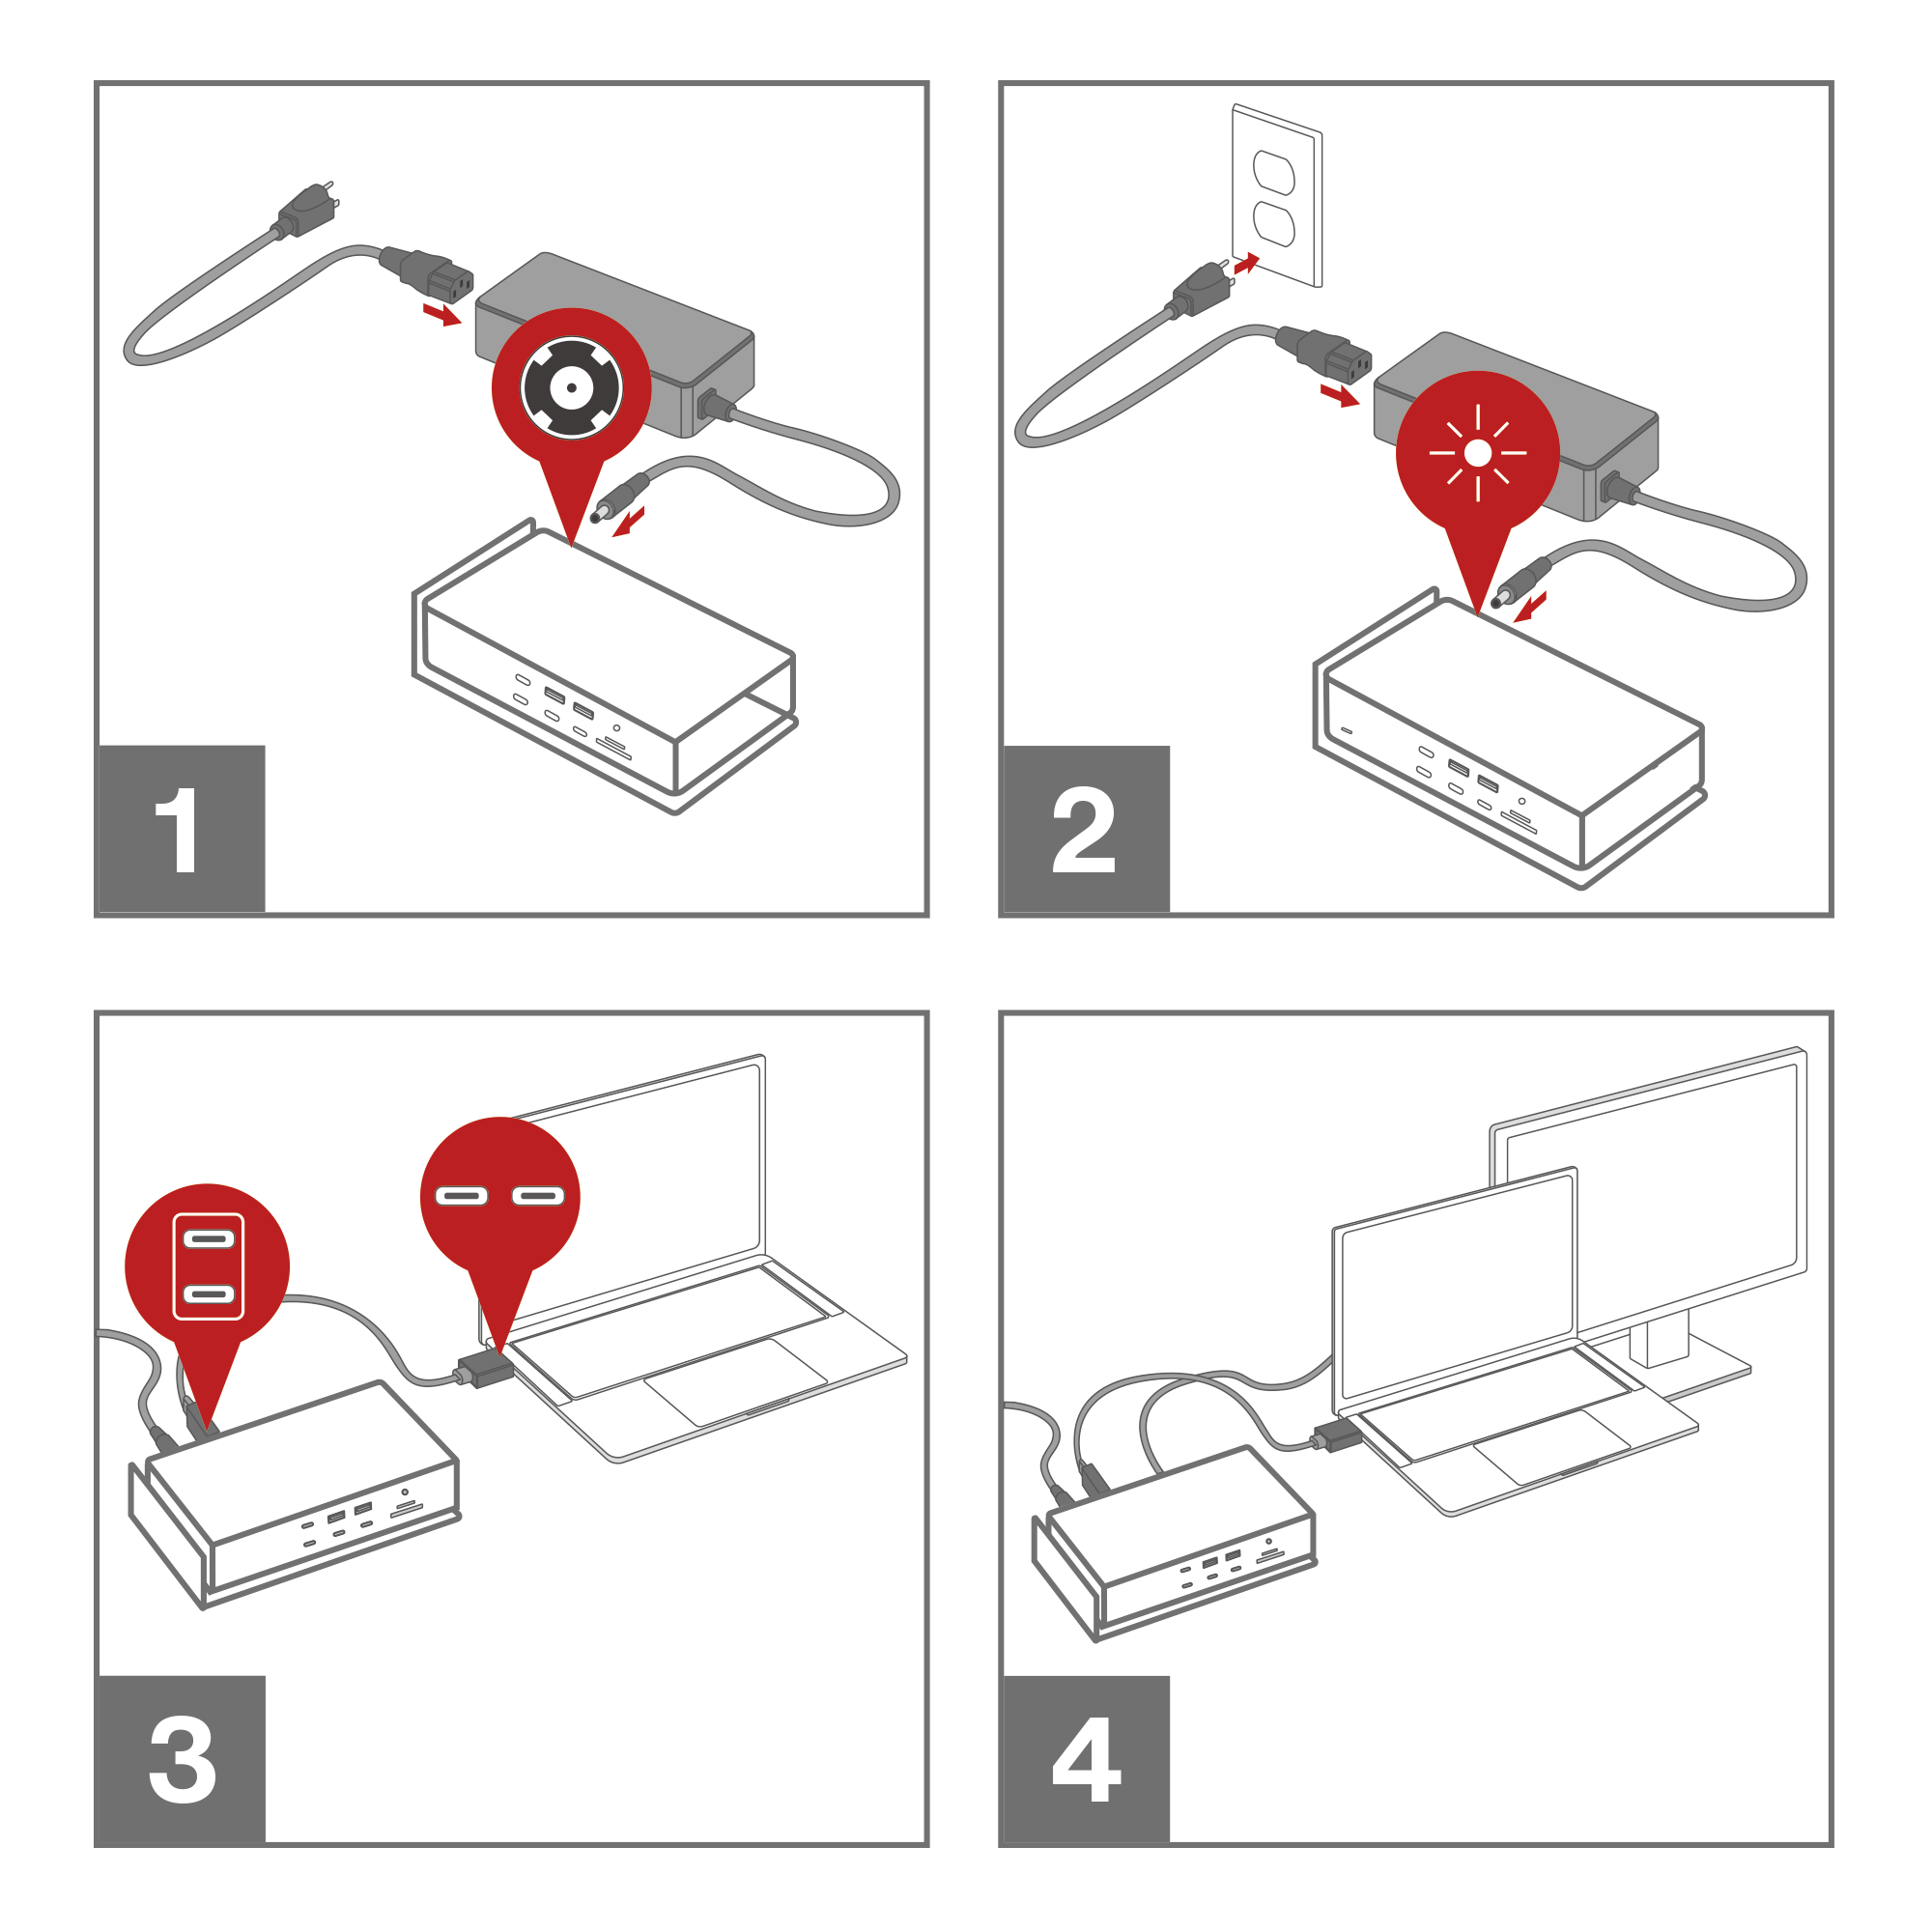
Step 1
Connect the adapter's AC power cord to the adapter's AC input, and connect the adapter's DC output to the dock's power input.
Step 2
Connect the AC power plug of the adapter to a power outlet, the power indicator will light up.
Step 3
Connect one end of the included dual USB-C cable to the corresponding upstream port of the docking and connect the other end to a MacBook.
Step 4
Connect the display to the corresponding port of the dock to start the multi-screen experience.
P.S. To turn off the docking station, simply unplug the AC power cord from the power outlet.
What is the minimum macOS version required for using this docking station?
macOS 11.5 or later.
Is this dock compatible with Windows laptop?
Unfortunately, no. The FusionDock Max 1 has been engineered with Apple silicon MacBooks in mind, especially given its Dual USB-C Cable, making it incompatible with Windows laptops.
What is the difference between the two 10Gbps USB-C ports?
The two ports were designed with different functional priorities:
USB-C Port without Power Delivery (PD): Primarily intended for data transfer, this port offers faster and more stable transmission speeds, making it ideal for connecting external storage devices such as portable hard drives and USB flash drives.
USB-C Port with Power Delivery (PD): Designed mainly for charging purposes, this port is better suited for connecting devices that require power, such as smartphones and tablets.
In summary, the non-PD USB-C port is optimized for high-speed data transfer, while the PD-enabled USB-C port is tailored for efficient charging of compatible devices.
No video output / Display is not recognized
1. Check accessories and connections
Step 1: Ensure that the video cable (HDMI or USB-C) is firmly connected to the monitor.
Step 2: If you wish to use a converter cable with the iVANKY docking station, to avoid issues with cable quality, please use the iVANKY provided cable and connect to ports 9 / 12 to ensure normal operation of the product.

Step 3: Select the upper-left Apple menu icon, go to “System Settings”, click on “Displays”, and choose the computer-recommended resolution.

Step 4: Flip the USB-C cable connecting the docking station to the computer and plug it in again.
Step 5: Attempt connecting to other Thunderbolt ports on your Mac.
Step 6: In the upper-left Apple menu, go to “System Settings”, click on “Displays”. If the external monitor is recognized but displays no image, replace the HDMI cable. If the issue persists, report to iVANKY customer support.
2. Monitor detection
Step 1: Disconnect the monitor from the docking station and reconnect. Turning off the monitor first might help.
Step 2: Manually select the correct signal source input on the monitor, such as HDMI signal input.
Step 3: Restart your Mac. For Mac laptops, close the lid for a few seconds and then reopen it.
Step 4: Select the upper-left Apple menu icon, go to “System Settings”, click on “Displays”, hold the “Option” key to display the “Detect Displays” button, and press this button more than 10 times.
3. Allow docking station connection
Step 1: Select the upper-left Apple menu icon, go to “System Settings”, choose “Privacy & Security”.
Step 2: Scroll down and click the pop-up menu next to “Allow accessories to connect”, then select the desired option. Learn more about these options.

4. Check monitor brightness
Step 1: If your external monitor has a black screen, ensure the “Brightness” is not set too low.
Step 2: If using an Apple keyboard and monitor, use the keyboard's brightness keys. Alternatively, select the upper-left Apple menu icon, go to “System Settings”, click on “Displays”, and use the brightness control.

Step 3: If the external monitor is not Apple-made, use its built-in controls and menu system to adjust brightness. If unable to adjust brightness and the monitor is black, it may lack power or have a malfunction.

5. Software update
a. Software updates can affect monitor detection, image quality, resolution, and refresh rate availability.
Install the latest macOS updates; these updates may provide firmware updates for Apple-made monitors.
b. For non-Apple monitors, ensure the firmware is up-to-date from the manufacturer. Refer to the monitor's documentation or the manufacturer's website for details.
c. If issues persist after trying the above methods, provide information on macOS version, malfunctioning devices, and device models, preferably with relevant purchase links. We need to confirm whether there are compatibility issues. Contact iVANKY customer support for assistance.
Screen flickering
1. Check accessories and connections
Step 1: Unplug the DC cable, wait for 30 seconds, then reconnect the DC cable.
Step 2: Confirm the USB-C ports on the docking station are clean and free of debris. If necessary, use compressed air to clean those USB-C ports.
Step 3: Ensure that the video cable (HDMI or USB-C) is firmly connected to the monitor.
Step 4: Replug the accessories connecting the Mac and the monitor. If necessary, try flipping the dual USB-C cable on the MacBook side.
Step 5: If you wish to use a converter cable with the iVANKY docking station, to avoid issues with cable quality, please use the iVANKY provided cable and connect to ports 9 / 12 to ensure normal operation of the product.
Step 6: Replace the dual USB-C cables, recommended to use USB4 cables within 1m (3.3ft) to connect to ports 9 and 12 on the docking station.
Step 7: Select the upper-left Apple menu, go to “System Settings”, click on “Displays”, and choose the computer-recommended resolution.
Step 8: Change to a different video interface on the monitor.
Step 9: Ensure your Mac system is up-to-date.
2. Check the monitor's condition
Step 1: Confirm if screen artifacts are due to a cracked screen. Turn on the screen, visible cracks may have dirt or liquid leakage. If present, contact the monitor's support.
Step 2: After restarting, without opening any software, test if there's a conflict with apps. If the issue only occurs with a specific app, uninstall and reinstall the app or update to the latest version. If the problem persists, contact the app's customer service.
Step 3: Install the latest macOS updates; these updates may provide firmware updates for Apple-made monitors.
If your monitor is not an Apple brand, ensure it's using the latest firmware provided by the manufacturing company. Refer to the monitor's documentation or the manufacturer's website for details.
If the previously mentioned methods don't resolve your issue, we kindly ask you to provide detailed information to our customer support. This includes the specific macOS version currently installed on your MacBook, the exact port that is failing to operate correctly, the model of your external monitor, and the precise model of your MacBook, including its year and specifications.
Unable to connect 2 monitors
1. Confirm if your Mac supports dual-screen usage
FusionDock Max 1 dual-screen output is only supported on M1 Pro / M1 Max / M2 Pro / M2 Max / M3 Pro / M3 Max MacBook Pros.
2. Check accessories and connections
Step 1: Ensure that the video cable (HDMI or USB-C) is firmly connected to the monitor.
Step 2: If you wish to use a converter cable with the iVANKY docking station, to avoid issues with cable quality, please use the iVANKY provided cable and connect to ports 9 / 12 to ensure normal operation of the product.
Step 3: Select the upper-left Apple menu icon, go to “System Settings”, click on “Displays”, and choose the computer-recommended resolution.
Step 4: Flip the USB-C cable connecting the docking station to the computer and plug it in again.
Step 5: Attempt connecting to other Thunderbolt ports on your Mac.
Step 6: In the upper-left Apple menu, go to “System Settings”, click on “Displays”. If the external monitor is recognized but displays no image, replace the HDMI cable. If the issue persists, report to iVANKY customer support.
3. Monitor detection
Step 1: Disconnect the monitor from the docking station and reconnect. Turning off the monitor first might help.
Step 2: Manually select the correct signal source input on the monitor, such as HDMI signal input.

Step 3: Restart your Mac.
Step 4: Select the upper-left Apple menu icon, go to “System Settings”, click on “Displays”, hold the “Option” key to display the “Detect Displays” button, and press this button more than 10 times.
4. Allow docking station connection
Step 1: Select the upper-left Apple menu icon, go to “System Settings”, choose “Privacy & Security”.
Step 2: Scroll down and click the pop-up menu next to “Allow accessories to conne c”, then select the desired option.
5. Check monitor brightness
Step 1: If your external monitor has a black screen, ensure the “Brightness” is not set too low.
Step 2: If using an Apple keyboard and monitor, use the keyboard's brightness keys. Alternatively, select the upper-left Apple menu icon, go to “System Settings”, click on “Displays”, and use the brightness control.
Step 3: If the external monitor is not Apple-made, use its built-in controls and menu system to adjust brightness. In cases where adjusting the brightness is not possible and the screen remains black, it's likely due to a lack of power or a malfunction in the monitor.
6. Software update
a. Software updates can affect monitor detection, image quality, resolution, and refresh rate availability.
Install the latest macOS updates; these updates may provide firmware updates for Apple-made monitors.
b. For non-Apple monitors, ensure the firmware is up-to-date from the manufacturer. Refer to the monitor's documentation or the manufacturer's website for details.
c. If the previously mentioned methods don't resolve your issue, we kindly ask you to provide detailed information to our customer support. This includes the specific macOS version currently installed on your MacBook, the exact port that is failing to operate correctly, the model of your external monitor, and the precise model of your MacBook, including its year and specifications.
Please provide feedback in the following format:
Port 5 not working
MacBook Model: MacBook Pro 14 M2 Max 2023
macOS: Ventura 13.3.1
Model of External Monitor:
Unable to connect 4 monitors
1. Confirm if your Mac supports quad-screen setup
FusionDock Max 1 quad-screen output is only supported on M1 Max / M2 Max / M3 Max MacBook Pros.
Before starting to use four screens, we recommend that you use ports 5/7/8/10 or 7/10/11/14.
2. Check accessories and connections
Step 1: Ensure that the video cable (HDMI or USB-C) is firmly connected to the monitor.
Step 2: If you wish to use a converter cable with the iVANKY docking station, to avoid issues with cable quality, please use the iVANKY provided cable and connect to ports 9 / 12 to ensure normal operation of the product.
Step 3: In the upper-left icon, go to “System Settings”, click on “Displays”, and choose the computer-recommended resolution.
Step 4: Flip the USB-C cable connecting the docking station to the computer and plug it in again.
Step 5: Attempt connecting to other Thunderbolt ports on your Mac.
Step 6: In the upper-left Apple menu, go to “System Settings”, click on “Displays”. If the external monitor is recognized but displays no image, replace the HDMI cable. If the issue persists, report to iVANKY customer support.
3. Monitor detection
Step 1: Disconnect the monitor from the docking station and reconnect. Turning off the monitor first might help.
Step 2: Manually select the correct signal source input on the monitor, such as HDMI signal input.

Step 3: Restart your Mac. For Mac laptops, close the lid for a few seconds and then reopen it.
Step 4: Select the upper-left Apple menu icon, go to “System Settings”, click on “Displays”, hold the “Option” key to display the “Detect Displays” button, and press this button more than 10 times.
4. Allow docking station connection
Step 1: Select the upper-left Apple menu icon, go to “System Settings”, choose “Privacy & Security”.
Step 2: Scroll down and click the pop-up menu next to “Allow accessories to connect”, then select the desired option. Learn more about these options.
5. Check monitor brightness
Step 1: If experiencing a black screen on your external monitor, ensure the “Brightness” is not set too low.
Step 2: If using an Apple keyboard and monitor, use the keyboard's brightness keys. Alternatively, select the upper-left Apple menu icon, go to “System Settings”, click on “Displays”, and use the brightness control.
Step 3: If the external monitor is not Apple-made, use its built-in controls and menu system to adjust brightness. If unable to adjust brightness and the monitor is black, it may lack power or have a malfunction.
6. Software update
a. Software updates can affect monitor detection, image quality, resolution, and refresh rate availability.
Install the latest macOS updates; these updates may provide firmware updates for Apple-made monitors.
b. For non-Apple monitors, ensure the firmware is up-to-date from the manufacturer. Refer to the monitor's documentation or the manufacturer's website for details.
If the previously mentioned methods don't resolve your issue, we kindly ask you to provide detailed information to our customer support. This includes the specific macOS version currently installed on your MacBook, the exact port that is failing to operate correctly, the model of your external monitor, and the precise model of your MacBook, including its year and specifications.
External monitor(s) can't reach its highest resolution.
1. Check accessories and connections
Step 1: Replug the docking station's connection to your MacBook. If necessary, flip the dual USB-C cable on the Mac side and reconnect.
Step 2: If conditions permit, replace the dual USB-C cables, recommended to use USB4 cables within 1m (3.3ft) to connect to ports 9 and 12 on the docking station.
Step 3: Please connect a monitor independently to the Mac and verify if the resolution is correct.
Send Mac model information, macOS details, and problematic monitor model information to iVANKY support. We will promptly confirm if there are compatibility issues with the product.
Issues on 6K display(s)
NOTE: Only ports 7/10/11/14 can support 6K resolution output. MacBook M1/M2/M3 Pro can support dual 6K output through the Thunderbolt port, and MacBook M1/M2/M3 Max can support triple 6K output through the Thunderbolt port.
Step 1: Step 1: Ensure that the video cable (HDMI or USB-C) is firmly connected to the monitor.
Step 2: If you wish to use a converter cable with the iVANKY docking station, to avoid issues with cable quality, please use the iVANKY provided cable and connect to ports 9 / 12 to ensure normal operation of the product.
Step 3: If unable to output normally, please contact iVANKY support for assistance in solving the issue or for replacement.
Unable to connect to the network
1. Check wiring and connections
Step 1: Observe if the LED indicator on the docking station is on.
Step 2: Please unplug and reconnect the cable connecting the device and the dock / USB-C cable between the dock and Mac / DC power adapter.
Step 3: Please unplug and reconnect the Ethernet cable to the dock. Under normal circumstances, you can see a steady green light and a flashing orange light inside the Ethernet port. If the light is flickering abnormally or there is no light, try using other network connection devices to confirm whether the Ethernet port is functioning properly.
Step 4: Shine the phone flashlight on the docking station's Ethernet port, check if there is damage to the socket such as bent or deformed PINs. If PINs are found to be deformed or recessed, use a toothpick or similar sharp needle to correct the PINs to their normal state. If the docking station port is damaged causing the network cable to loosen, you can use tape or other external items to fix it, or contact iVANKY customer service for replacement.
Step 5: Ensure macOS is up-to-date and all Mac software is the latest version.
Step 6: Update the Mac network driver, details can be found on the iVANKY official website link: https://ivanky.com/blogs/news/ivanky-ethernet-driver-download-guide
Step 7: Click on the top left corner Apple menu, find “System Settings” > click on “Network” > you can see USB 10/100/1000 LAN & USB 10/100/1G/2.5G LAN > observe the status indicator appears below the service name, and choose the corresponding operation steps. If the network is not recognized, please go to the “Grey status indicator (no recognition of network access)” section.
2. Yellow status indicator below the service name (self-assigned IP)

Step 1: Restart the computer to reassign the IP address.
Step 2: Connect the Ethernet cable directly to another device (such as a desktop computer or a laptop with a network port) to test if the Ethernet cable is working normally.
Step 3: Turn off the modem or router and wait for 5 minutes, then turn it on again to reassign the IP address.
Step 4: Replug the Ethernet cable to reassign the IP address.
Step 5: Reset the router to reassign the IP address.
3. Grey status indicator below the service name (no recognition of network access)

Step 1: Connect the Ethernet cable directly to another device (such as a desktop computer or a laptop with a network port) to test if the network cable is working normally.
Step 2: Create an Apple sub-account, restart and select the sub-account to enter, test for non-recognition of the network due to software conflicts on the computer.
4. Green status indicator (connected but not working)

Step 1: Replug the Ethernet cable.
Step 2: Connect the Ethernet cable directly to another device (such as a desktop computer or a laptop with a network port) to test if the Ethernet cable is working normally.
Step 3: Try replacing the Ethernet cable.
If the previously mentioned methods don't resolve your issue, we kindly ask you to provide detailed information to our customer support. This includes the specific macOS version currently installed on your MacBook, and the precise model of your MacBook, including its year and specifications.
Slow internet speed
1. Check accessories and connections
Step 1: Restart the Mac and ensure that both the dual USB-C cable and Ethernet cable at both ends are correctly connected and firmly connected.
Step 2: Replug the accessories connecting the Mac and the monitor. If necessary, try flipping the dual USB-C cable connecting the docking station to the Mac and reinserting the Ethernet cable.
Step 3: Directly connect the Ethernet cable to the Mac or establish a Wi-Fi connection to see if the Internet speed has returned to normal.
Step 4: Unplug all devices except the Ethernet from the docking station. On the router side, unplug all devices and only keep the network cable connected to the docking station interface. If there is a problem, try using another WAN interface on the router for testing.
Step 5: Inquire with the network cable seller to check if the current cable supports gigabit network. Under normal network testing conditions, check if the network cable can meet the requirements of ≥800MB/s. If there are other network-connected devices, try connecting the router network cable to that device to confirm whether the router and network cable can meet the requirements of gigabit network speed. If it cannot meet, please contact the network cable seller for cable replacement.
2. Restart the router
Step 1: Unplug the router and Ethernet cable and wait for at least 30 seconds.
Step 2: Reconnect the Ethernet cable to the router.
Step 3: Once the Internet indicator light is on (normally, you can see a constant green light and a blinking orange light inside the network port), check if the Internet connection is normal on your Mac.
3. Update software
Step 1: Ensure macOS is up-to-date and all Mac software is the latest version.
Step 2: Update the Mac network driver, details can be found on the iVANKY official website link: https://ivanky.com/blogs/news/ivanky-ethernet-driver-download-guide
If the previously mentioned methods don't resolve your issue, we kindly ask you to provide detailed information to our customer support. This includes the specific macOS version currently installed on your MacBook, and the precise model of your MacBook, including its year and specifications.
Feedback format reference:
MacBook model: MacBook Pro 14 M2 Max 2023
macOS: Ventura 13.3.1
Ethernet cable purchase link: [Insert link here]
Frequent disconnection
Step 1: Restart the Mac, ensuring that the USB-C cable and network cable are correctly and securely connected at both ends to the external docking station.
Step 2: Update macOS and all Mac software to their latest versions. Close all applications except Google Chrome, then test for any conflicts that may cause disconnections between Google Chrome and other apps. If the network remains stable with only Google Chrome active, please reach out to the iVANKY customer service team.
Step 3: Click the Apple icon in the top left corner, navigate to “System Settings” > “Network,” and locate “USB 10/100/1000 LAN & USB 10/100/1G/2.5G LAN.” Check for any issues with frequent disconnections.
Step 4: Use a phone flashlight to inspect the docking station's RJ45 socket. Check for any damage, such as bent or deformed pins. If pins are found to be deformed or recessed, use a toothpick or a similar sharp object to gently realign them. If the docking station port is damaged, causing the network cable to loosen, either secure it with tape or another suitable item, or contact iVANKY customer service for a replacement.
Step 5: Test the network cable by connecting it directly to another device, such as a desktop computer or a laptop with a network port, to see if disconnections occur.
Step 6: If the issue persists, consider replacing the network cable.
2. Check network environment
Step 1: Restart the computer to refresh the IP address.
Step 2: Power off the modem or router, wait for 5 minutes, and then power it back on to update the IP address.
Step 3: Reconnect the network cable to ensure the IP address is correctly assigned.
3. Update software
Step 1: Ensure macOS is up-to-date and all Mac software is the latest version.
Step 2: Update the Mac network driver, details can be found on the iVANKY official website link: https://ivanky.com/blogs/news/ivanky-ethernet-driver-download-guide
If the previously mentioned methods don't resolve your issue, we kindly ask you to provide detailed information to our customer support. This includes the specific macOS version currently installed on your MacBook, and the precise model of your MacBook, including its year and specifications.
USB-C port not working
Step 1: Observe if the LED indicator on the docking station is on.
Step 2: Please reconnect the device and docking station using the cable / USB-C cable between the docking station and Mac / DC power.
Step 3: Insert a device with a known working USB-C port to test port functionality (if normal, rule out product issues).
Step 4: Replace the USB-C cable, reinsert it, and test for cable issues.
Step 5: Test the same cable in another USB-C port to identify if the port is at fault.
Step 6: If the previously mentioned methods don't resolve your issue, we kindly ask you to provide detailed information to our customer support. This includes the specific macOS version currently installed on your MacBook, the exact port that is failing to operate correctly, and the precise model of your MacBook, including its year and specifications.
For example:
Port 7/10 not working.
MacBook Model: MacBook Pro 14 M2 Max 2023
macOS: Ventura 13.3.1
USB-A port not working
Step 1: Observe if the LED indicator on the docking station is on.
Step 2: Please reconnect the device and docking station using the cable / USB-C cable between the docking station and Mac / DC power.
Step 3: Insert a device with a known working USB-A port to test port functionality (if normal, rule out product issues).
Step 4: Replace the USB-A cable, reinsert it, and test for cable issues.
Step 5: Test the same cable in another USB-A port to identify if the port is at fault.
Step 6: If the previously mentioned methods don't resolve your issue, we kindly ask you to provide detailed information to our customer support. This includes the specific macOS version currently installed on your MacBook, the exact port that is failing to operate correctly, and the precise model of your MacBook, including its year and specifications.
For example:
Port 2/4 not working.
MacBook Model: MacBook Pro 14 M2 Max 2023
macOS: Ventura 13.3.1
3.5mm audio port has no sound output
1. Check wiring and connections
Step 1: Restart your Mac and ensure that both ends of the docking station power cord and audio cable are correctly connected and securely attached.
Step 2: Replug the connection between the docking station and your MacBook, if necessary, flip the dual USB-C cable on the Mac side before connecting again.
Step 3: After connecting the 3.5mm audio port, wait for 20 seconds before using.
Step 4: Unplug the DC cable, wait for 30 seconds, then reconnect the DC cable.
Step 5: Confirm that the 3.5mm audio port on the docking station is clean and free of debris. If necessary, use compressed air to clean the 3.5mm audio port.
Step 6: If possible, confirm that the 3.5mm audio cable connected to the docking station is functioning properly.
2. Check sound settings
Step 1: For troubleshooting, please disconnect every connected device from the docking station, leaving only the audio cable, mouse, and keyboard connected.
Step 2: Choose the Apple menu, select “System Settings”, and click on “Sound.”
Step 3: Click on the “Output” tab and select the external speakers & headphones connected to the audio cable. If you don't see the built-in speaker option in the “Output” window, contact iVANKY customer support.
Step 4: If the “Output Volume” slider is set to a low volume, move the slider to the right and retest.
Step 5: If the “Mute” checkbox is selected, unselect it and retest.
3. Port Alternation
Step 1: Alternate between port 1 and port 17.
Step 2: Recognition takes time, please wait for a minute.
Step 3: If the previously mentioned methods don't resolve your issue, we kindly ask you to provide detailed information to our customer support. This includes the specific macOS version currently installed on your MacBook, the model of your audio device, and the precise model of your MacBook, including its year and specifications.
Please provide feedback in the following format:
Port 1 not working
MacBook Model: MacBook Pro 14 M2 Max 2023
macOS: Ventura 13.3.1
Model of Audio Device:
3.5mm audio port not picking up sound input
Step 1: Check if the cable is securely connected, and the LED indicator on the docking station is on.
Step 2: Please connect the microphone to port 17.
Step 3: If possible, try another device to test if the port is having issues.
Step 4: If the previously mentioned methods don't resolve your issue, we kindly ask you to provide detailed information to our customer support. This includes the specific macOS version currently installed on your MacBook, the exact port that is failing to operate correctly, and the precise model of your MacBook, including its year and specifications.
Please provide feedback in the following format:
Port 17 not working
MacBook Model: MacBook Pro 14 M2 Max 2023
macOS: Ventura 13.3.1
Model of Audio Device:
Unable to charge my MacBook
1. Check power supply
Step 1: Observe if the LED indicator on the docking station is on.
Step 2: Please verify that you have connected the dual USB-C cable to the designated USB-C ports located within the white frame on the rear of the docking station.
Step 3: Restart the Mac. Then unplug and plug the USB-C cable between the dock and Mac.
Step 4: Unplug the DC cable, wait for 30 seconds, then reconnect the DC cable.
Step 5: When using a non-original dual USB-C cable, verify that it's directly connected to your Mac's PD power supply for charging. You can micro-adjust the cable while it's charging to test its reliability. If you encounter charging issues or it fails to charge, please replace the cable.
2. Test the power outlet
Step 1: Unplug the dock power adapter from the power outlet, then plug a known good device (such as a desk lamp) into the outlet to confirm that the device can be powered normally. If the power outlet can supply power normally, carefully observe whether the LED light on the dock power adapter is on.
Step 2: Try using the Thunderbolt 4 port to charge your phone / tablet to test if it can charge normally.
Step 3: If the previously mentioned methods don't resolve your issue, we kindly ask you to provide detailed information to our customer support. This includes the specific macOS version currently installed on your MacBook, and the precise model of your MacBook, including its year and specifications.
Feedback format reference:
MacBook model: MacBook Pro 14 M2 Max 2023
macOS version: Ventura 13.3.1
USB-C PD port not working
1. Check wiring, connections, and device compatibility
Step 1: Observe if the LED indicator on the docking station is on.
Step 2: Please unplug and reconnect the cable connecting the device and the dock / USB-C cable between the dock and Mac / DC power.
Step 3: Insert a known good device with a USB-C interface to test if the port is working normally.
Step 4: Replace the USB-C cable, reinsert it, and test if the cable has any issues.
Step 5: If the previously mentioned methods don't resolve your issue, we kindly ask you to provide detailed information to our customer support. This includes the specific macOS version currently installed on your MacBook, the model of the peripheral, and the precise model of your MacBook, including its year and specifications.
iPhone 15 not charging on the USB-C PD port
The FusionDock Max 1 features USB-C ports numbered 7, 10, 11, 14, and 18, all capable of charging the iPhone 15. We advise utilizing these specific ports for charging your iPhone 15.
SD/TF card not working
1. Check wiring and connections
Step 1: Observe if the LED indicator on the docking station is on.
Step 2: Please unplug and reconnect the cable connecting the device and the dock / USB-C cable between the dock and Mac / DC power.
Step 3: Confirm that the SD/TF card slot is clean and free of paper debris. If necessary, use compressed air to blow the SD/TF card slot.
Step 4: Insert the SD/TF card and confirm that the SD/TF card is functioning properly.
Step 5: If conditions allow, directly insert the SD/TF into the Mac to confirm if it can be used normally.
2. Reinsert the card
Step 1: Should the SD card fail to load, remove it and reinsert it, noting that insertion speed can impact its loading.
Step 2: If reinsertion doesn't work, please inform iVANKY customer service of your macOS version, MacBook model, and the specific SD card model used, to determine any compatibility issues.
Please provide feedback in the following format:
MacBook Model: MacBook Pro 14 M2 Max 2023
macOS: Ventura 13.3.1
Model of storage card: SanDisk Extreme PRO SD UHS-I Card 128G
If you encounter any issues while using the docking station please contact iVANKY technical support.
Email: support@ivanky.com
When contacting iVANKY technical support for technical issues, please provide the following information:
a. Your docking station serial number.
b. Your current macOS version.
c. Model of your MacBook.
d. Description of the issue and the devices connected to the dock.